> ## Documentation Index
> Fetch the complete documentation index at: https://docs.meshconnect.com/llms.txt
> Use this file to discover all available pages before exploring further.

# Launch the Mesh SDK

By the end of this guide, you'll know how to initialize and launch the Mesh SDK embedded in your app, as an overlay, or via Paylinks.

<Check>
  **Before you start**

  * You have a Mesh sandbox API key and the SDK installed for your platform (see [Prepare to build](/build/prepare-to-build))
  * You know how to fetch a Link Token (see [Fetch a Link Token](/build/fetch-link-token))
</Check>

## Overview

Mesh's client-side SDKs are supported on the following platforms:

<div style={{ margin: "0.75rem 0" }}>
  <div style={{ display: "flex", alignItems: "center", gap: "0.5rem", marginBottom: "0.35rem" }}>
    <span aria-hidden="true" style={{ fontSize: "16px", lineHeight: 1, flexShrink: 0 }}>🌐</span>
    <span>Web</span>
  </div>

  <div style={{ display: "flex", alignItems: "center", gap: "0.5rem", marginBottom: "0.35rem" }}>
    <svg xmlns="http://www.w3.org/2000/svg" viewBox="0 0 24 24" fill="#888888" style={{ width: "16px", height: "16px", flexShrink: 0 }}>
      <path d="M12.152 6.896c-.948 0-2.415-1.078-3.96-1.04-2.04.027-3.91 1.183-4.961 3.014-2.117 3.675-.546 9.103 1.519 12.09 1.013 1.454 2.208 3.09 3.792 3.039 1.52-.065 2.09-.987 3.935-.987 1.831 0 2.35.987 3.96.948 1.637-.026 2.676-1.48 3.676-2.948 1.156-1.688 1.636-3.325 1.662-3.415-.039-.013-3.182-1.221-3.22-4.857-.026-3.04 2.48-4.494 2.597-4.559-1.429-2.09-3.623-2.324-4.39-2.376-2-.156-3.675 1.09-4.61 1.09zM15.53 3.83c.843-1.012 1.4-2.427 1.245-3.83-1.207.052-2.662.805-3.532 1.818-.78.896-1.454 2.338-1.273 3.714 1.338.104 2.715-.688 3.559-1.701" />
    </svg>

    <span>iOS</span>
  </div>

  <div style={{ display: "flex", alignItems: "center", gap: "0.5rem", marginBottom: "0.35rem" }}>
    <svg xmlns="http://www.w3.org/2000/svg" viewBox="0 0 24 24" fill="#3DDC84" style={{ width: "16px", height: "16px", flexShrink: 0 }}>
      <path d="M18.4395 5.5586c-.675 1.1664-1.352 2.3318-2.0274 3.498-.0366-.0155-.0742-.0286-.1113-.043-1.8249-.6957-3.484-.8-4.42-.787-1.8551.0185-3.3544.4643-4.2597.8203-.084-.1494-1.7526-3.021-2.0215-3.4864a1.1451 1.1451 0 0 0-.1406-.1914c-.3312-.364-.9054-.4859-1.379-.203-.475.282-.7136.9361-.3886 1.5019 1.9466 3.3696-.0966-.2158 1.9473 3.3593.0172.031-.4946.2642-1.3926 1.0177C2.8987 12.176.452 14.772 0 18.9902h24c-.119-1.1108-.3686-2.099-.7461-3.0683-.7438-1.9118-1.8435-3.2928-2.7402-4.1836a12.1048 12.1048 0 0 0-2.1309-1.6875c.6594-1.122 1.312-2.2559 1.9649-3.3848.2077-.3615.1886-.7956-.0079-1.1191a1.1001 1.1001 0 0 0-.8515-.5332c-.5225-.0536-.9392.3128-1.0488.5449zm-.0391 8.461c.3944.5926.324 1.3306-.1563 1.6503-.4799.3197-1.188.0985-1.582-.4941-.3944-.5927-.324-1.3307.1563-1.6504.4727-.315 1.1812-.1086 1.582.4941zM7.207 13.5273c.4803.3197.5506 1.0577.1563 1.6504-.394.5926-1.1038.8138-1.584.4941-.48-.3197-.5503-1.0577-.1563-1.6504.4008-.6021 1.1087-.8106 1.584-.4941z" />
    </svg>

    <span>Android</span>
  </div>

  <div style={{ display: "flex", alignItems: "center", gap: "0.5rem", marginBottom: "0.35rem" }}>
    <svg xmlns="http://www.w3.org/2000/svg" viewBox="0 0 24 24" fill="#61DAFB" style={{ width: "16px", height: "16px", flexShrink: 0 }}>
      <path d="M14.23 12.004a2.236 2.236 0 0 1-2.235 2.236 2.236 2.236 0 0 1-2.236-2.236 2.236 2.236 0 0 1 2.235-2.236 2.236 2.236 0 0 1 2.236 2.236zm2.648-10.69c-1.346 0-3.107.96-4.888 2.622-1.78-1.653-3.542-2.602-4.887-2.602-.41 0-.783.093-1.106.278-1.375.793-1.683 3.264-.973 6.365C1.98 8.917 0 10.42 0 12.004c0 1.59 1.99 3.097 5.043 4.03-.704 3.113-.39 5.588.988 6.38.32.187.69.275 1.102.275 1.345 0 3.107-.96 4.888-2.624 1.78 1.654 3.542 2.603 4.887 2.603.41 0 .783-.09 1.106-.275 1.374-.792 1.683-3.263.973-6.365C22.02 15.096 24 13.59 24 12.004c0-1.59-1.99-3.097-5.043-4.032.704-3.11.39-5.587-.988-6.38-.318-.184-.688-.277-1.092-.278zm-.005 1.09v.006c.225 0 .406.044.558.127.666.382.955 1.835.73 3.704-.054.46-.142.945-.25 1.44-.96-.236-2.006-.417-3.107-.534-.66-.905-1.345-1.727-2.035-2.447 1.592-1.48 3.087-2.292 4.105-2.295zm-9.77.02c1.012 0 2.514.808 4.11 2.28-.686.72-1.37 1.537-2.02 2.442-1.107.117-2.154.298-3.113.538-.112-.49-.195-.964-.254-1.42-.23-1.868.054-3.32.714-3.707.19-.09.4-.127.563-.132zm4.882 3.05c.455.468.91.992 1.36 1.564-.44-.02-.89-.034-1.345-.034-.46 0-.915.01-1.36.034.44-.572.895-1.096 1.345-1.565zM12 8.1c.74 0 1.477.034 2.202.093.406.582.802 1.203 1.183 1.86.372.64.71 1.29 1.018 1.946-.308.655-.646 1.31-1.013 1.95-.38.66-.773 1.288-1.18 1.87-.728.063-1.466.098-2.21.098-.74 0-1.477-.035-2.202-.093-.406-.582-.802-1.204-1.183-1.86-.372-.64-.71-1.29-1.018-1.946.303-.657.646-1.313 1.013-1.954.38-.66.773-1.286 1.18-1.868.728-.064 1.466-.098 2.21-.098zm-3.635.254c-.24.377-.48.763-.704 1.16-.225.39-.435.782-.635 1.174-.265-.656-.49-1.31-.676-1.947.64-.15 1.315-.283 2.015-.386zm7.26 0c.695.103 1.365.23 2.006.387-.18.632-.405 1.282-.66 1.933-.2-.39-.41-.783-.64-1.174-.225-.392-.465-.774-.705-1.146zm3.063.675c.484.15.944.317 1.375.498 1.732.74 2.852 1.708 2.852 2.476-.005.768-1.125 1.74-2.857 2.475-.42.18-.88.342-1.355.493-.28-.958-.646-1.956-1.1-2.98.45-1.017.81-2.01 1.085-2.964zm-13.395.004c.278.96.645 1.957 1.1 2.98-.45 1.017-.812 2.01-1.086 2.964-.484-.15-.944-.318-1.37-.5-1.732-.737-2.852-1.706-2.852-2.474 0-.768 1.12-1.742 2.852-2.476.42-.18.88-.342 1.356-.494zm11.678 4.28c.265.657.49 1.312.676 1.948-.64.157-1.316.29-2.016.39.24-.375.48-.762.705-1.158.225-.39.435-.788.636-1.18zm-9.945.02c.2.392.41.783.64 1.175.23.39.465.772.705 1.143-.695-.102-1.365-.23-2.006-.386.18-.63.406-1.282.66-1.933zM17.92 16.32c.112.493.2.968.254 1.423.23 1.868-.054 3.32-.714 3.708-.147.09-.338.128-.563.128-1.012 0-2.514-.807-4.11-2.28.686-.72 1.37-1.536 2.02-2.44 1.107-.118 2.154-.3 3.113-.54zm-11.83.01c.96.234 2.006.415 3.107.532.66.905 1.345 1.727 2.035 2.446-1.595 1.483-3.092 2.295-4.11 2.295-.22-.005-.406-.05-.553-.132-.666-.38-.955-1.834-.73-3.703.054-.46.142-.944.25-1.438zm4.56.64c.44.02.89.034 1.345.034.46 0 .915-.01 1.36-.034-.44.572-.895 1.095-1.345 1.565-.455-.47-.91-.993-1.36-1.565z" />
    </svg>

    <span>React Native</span>
  </div>

  <div style={{ display: "flex", alignItems: "center", gap: "0.5rem" }}>
    <svg xmlns="http://www.w3.org/2000/svg" viewBox="0 0 24 24" fill="#02569B" style={{ width: "16px", height: "16px", flexShrink: 0 }}>
      <path d="M14.314 0L2.3 12 6 15.7 21.684.013h-7.357zm.014 11.072L7.857 17.53l6.47 6.47H21.7l-6.46-6.468 6.46-6.46h-7.37z" />
    </svg>

    <span>Flutter</span>
  </div>
</div>

Those SDKs are home to **Link**, the Mesh-hosted experience that facilitates the user journey (ie. connecting an account, configuring / previewing / approving transfers, verifying wallet ownership, etc.). You'll launch an SDK session using a Link Token. This guide will walk you through how to launch an SDK session, including code snippets for each SDK.

## Initialize the Mesh SDK

You have 3 options for how to launch Link. You should choose which one fits your UX and other needs the best.

### Option 1: Embedded (web SDK only)

**Recommended for web implementations**

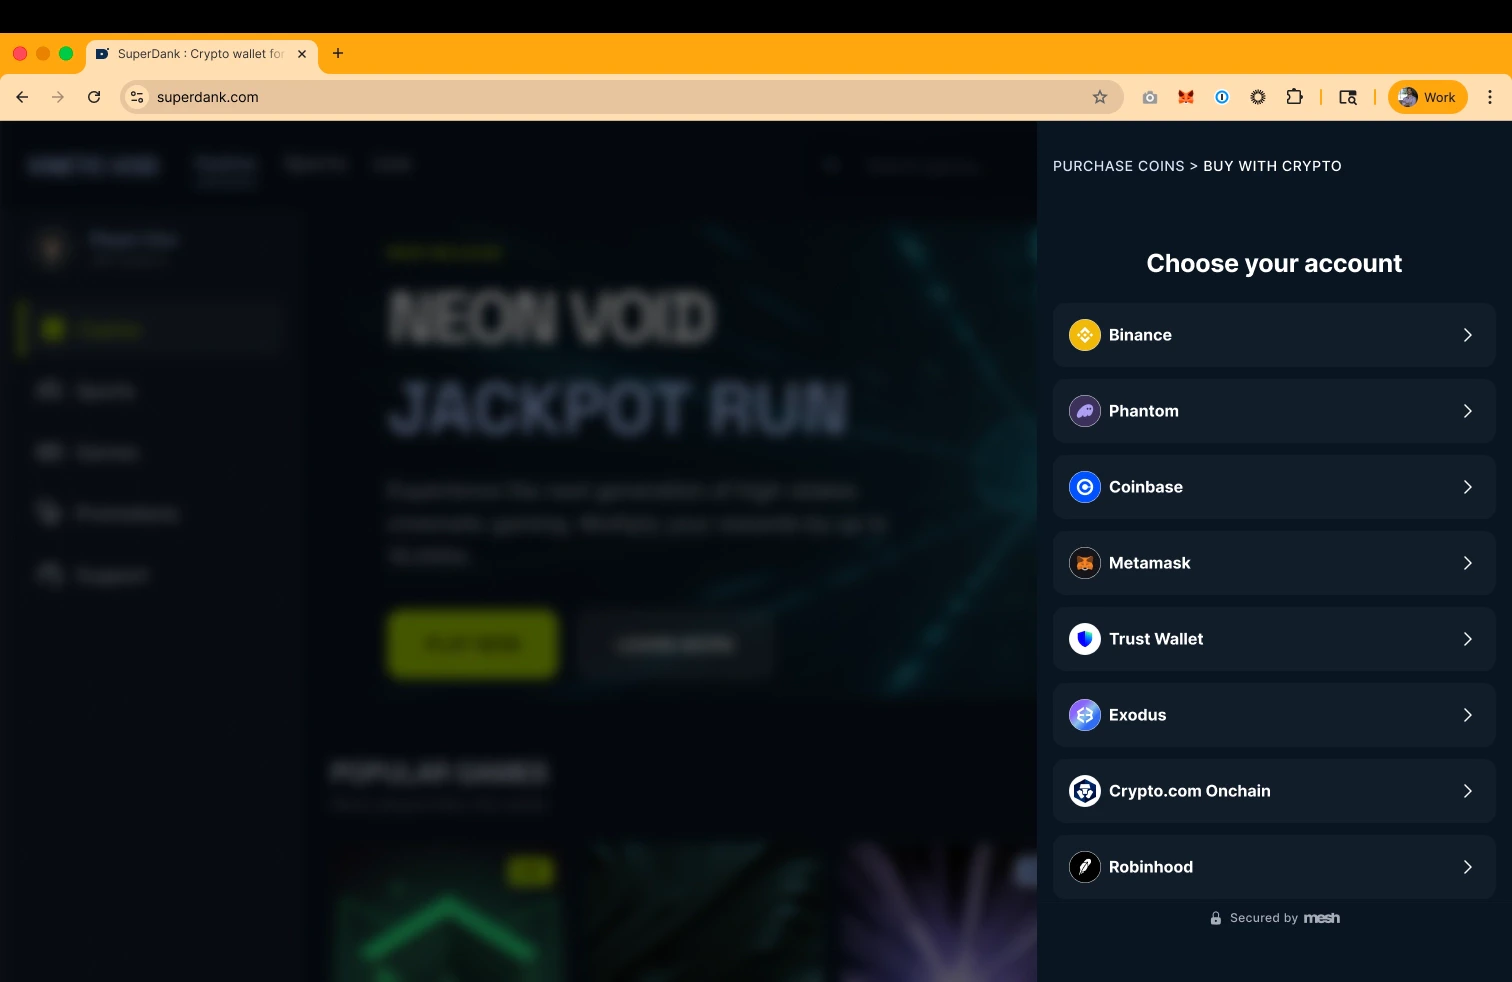
Link can be embedded as an iframe into a container within your product surface area. This makes it feel more native to your product by minimizing the "seam" between your app and Mesh. You provide a custom iframe ID in the `openLink` function of the web SDK.

While this path will feel more native to your platform, it also comes with a slightly more involved implementation. Please see the [Polish the experience](/build/polish) guide for important instructions on how to properly implement this experience.

<Frame>
  <img src="https://mintcdn.com/mesh-40/Y-QnDCJ7fcNNqJ5o/images/image-8.png?fit=max&auto=format&n=Y-QnDCJ7fcNNqJ5o&q=85&s=add63ef76b4ca04671f946de2dc3a17e" alt="Image" width="1512" height="982" data-path="images/image-8.png" />
</Frame>

<AccordionGroup>
  <Accordion icon="https://mintcdn.com/mesh-40/Y-QnDCJ7fcNNqJ5o/images/icons/web.svg?fit=max&auto=format&n=Y-QnDCJ7fcNNqJ5o&q=85&s=6fd7faf20edd7e5cec27f3550deb55ef" title="Web SDK initialization structure" width="24" height="24" data-path="images/icons/web.svg">
    You'll include a custom iframe ID in the `openLink` function when embedding Link into a container in your product (see end of snippet).

    <div className="parameter-reference">
      <Accordion title="Parameter reference">
        <div className="param-list">
          <div className="param-row">
            <div className="param-name"><code>renderType</code></div>
            <div className="param-body">`embedded` indicates this will not be an overlay, and will slightly modify the UX (importantly, the Mesh SDK nav bar goes away except for the back `<` button). When embedded, add a custom-iframe-id in the `openLink` function.</div>
          </div>

          <div className="param-row">
            <div className="param-name"><code>custom-iframe-id</code> (not a parameter, but including here for clarity)</div>
            <div className="param-body">Lets you embed the Mesh SDK directly into a container within your product surface area.</div>
          </div>

          <div className="param-row">
            <div className="param-name"><code>language</code></div>
            <div className="param-body">You can use the `system` setting to match their device or browser default, or you can specify a language if you have such a setting in user profiles. See the [Multi-language support](/resources/multi-language) guide for more info on supported languages.</div>
          </div>

          <div className="param-row">
            <div className="param-name"><code>theme</code></div>
            <div className="param-body">You can use the `system` setting to match their device or browser default, or you can specify a theme if you have such a setting in user profiles.</div>
          </div>

          <div className="param-row">
            <div className="param-name"><code>displayFiatCurrency</code></div>
            <div className="param-body">Link defaults to USD, or you can specify a fiat currency if you have such a setting in user profiles. See the [Fiat currency support](/resources/fiat-currency) guide for more info on supported currencies</div>
          </div>

          <div className="param-row">
            <div className="param-name"><code>accessTokens</code></div>
            <div className="param-body">After users connect an exchange account, Mesh can maintain authorization so that the user doesn't have to login again. This enables a 1 or 2 click transfer experience for return users. See the [Use Mesh's callback functions](/build/callbacks) guide for more information on consuming Mesh SDK events and handling them with callback functions, and the [Supercharge return-users](/build/return-users) guide to set up a return user experience</div>
          </div>

          <div className="param-row">
            <div className="param-name"><code>linkToken</code></div>
            <div className="param-body">Link token returned by the Mesh backend.</div>
          </div>
        </div>
      </Accordion>
    </div>

    ```javascript theme={null}
    const connection = createLink({
      renderType: 'embedded', // Indicates Link will be embedded in a container within your web app
      theme: 'system',
      language: 'system',
      displayFiatCurrency: 'USD',
      accessTokens: accessTokens, // See "Supercharge return users" guide
      onIntegrationConnected: payload => {
        // Payload contains integration tokens that can be passed to SDK for a return user experience, or calling certain Mesh APIs
        console.log('[MESH LINK integration connected]', payload)
      },
      onTransferFinished: payload => {
        // Called after a transfer flow completes successfully
        console.log('[MESH LINK transfer finished]', payload)
      },
      onExit: () => {
        // Called when Link is closed
        console.log('[MESH LINK exited]')
      },
      onEvent: ev => {
        // Allows you to handle other specific events
        console.log('[MESH LINK event]', ev)
      }
    })

    connection.openLink(linkToken, 'custom-iframe-id') // Open in your custom iframe
    ```

    * The `createLink` function accepts one argument, a configuration Object typed `LinkOptions` and returns an Object with two functions, `openLink` and `closeLink`. Calling `openLink` will render the Link UI in an iframe. Calling `closeLink` will close the already-rendered Link UI. Please note, that the Link UI will close itself once the user finishes their workflow.
  </Accordion>
</AccordionGroup>

### Option 2: Overlay

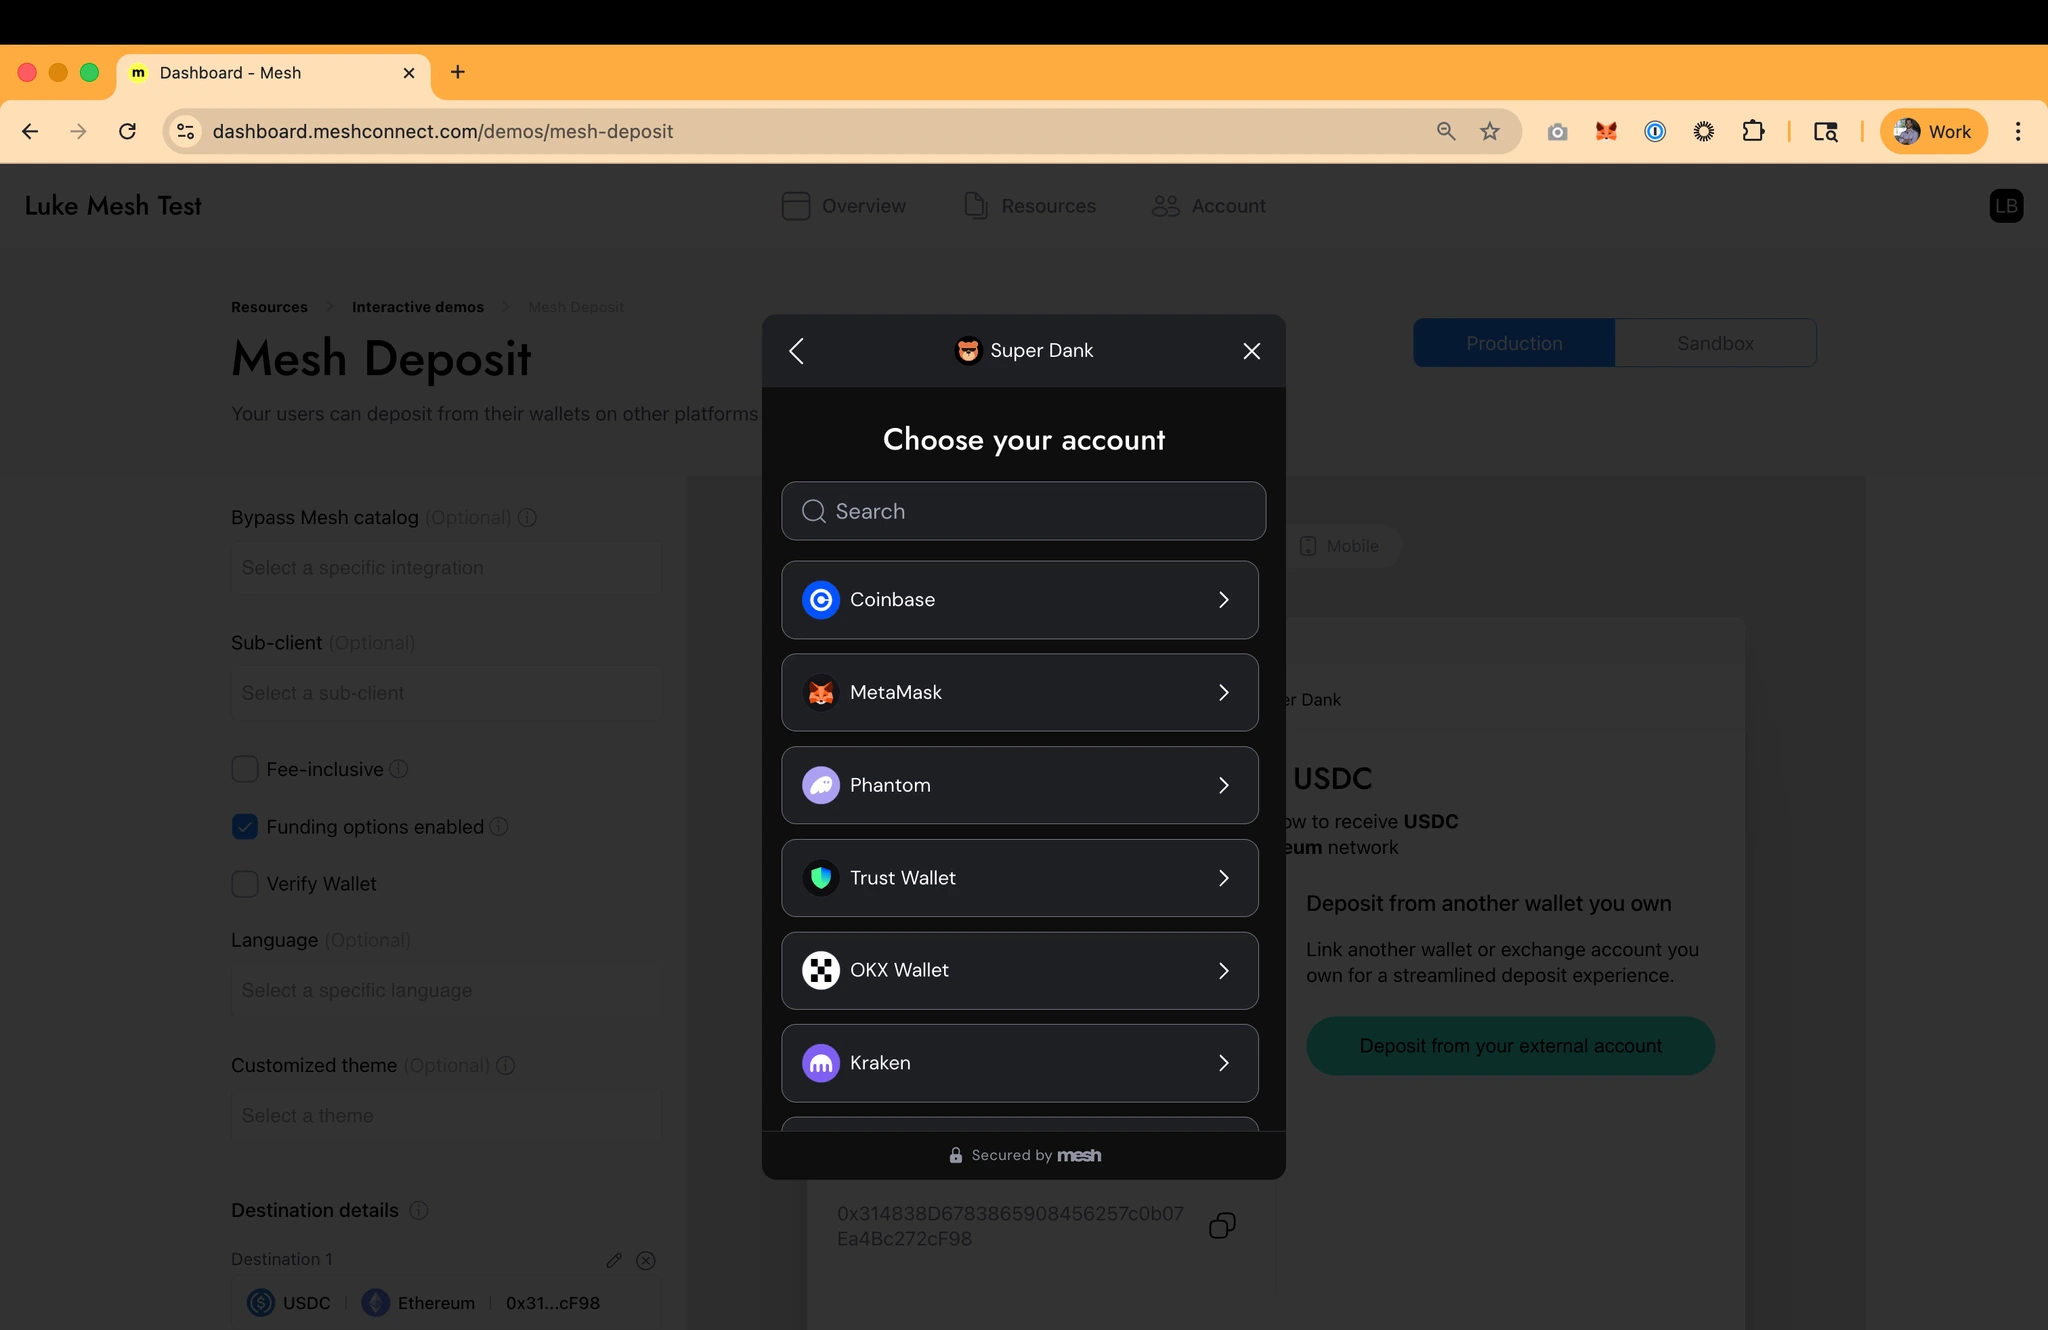
Link opens as a modal on top of your product, with a semi-opaque overlay behind it. This focuses the user on the task at hand and minimizes background noise and distractions.

<Frame>
  <img src="https://mintcdn.com/mesh-40/Y-QnDCJ7fcNNqJ5o/images/image-9.png?fit=max&auto=format&n=Y-QnDCJ7fcNNqJ5o&q=85&s=db2daedf9716ec9dadfa521642117cd8" alt="Image" width="2048" height="1330" data-path="images/image-9.png" />
</Frame>

<AccordionGroup>
  <Accordion icon="https://mintcdn.com/mesh-40/Y-QnDCJ7fcNNqJ5o/images/icons/web.svg?fit=max&auto=format&n=Y-QnDCJ7fcNNqJ5o&q=85&s=6fd7faf20edd7e5cec27f3550deb55ef" title="Web SDK initialization structure" width="24" height="24" data-path="images/icons/web.svg">
    <div className="parameter-reference">
      <Accordion title="Parameter reference">
        <div className="param-list">
          <div className="param-row">
            <div className="param-name"><code>renderType</code></div>
            <div className="param-body">`overlay` indicates Mesh will pop up over your product and ensures certain UX elements behave accordingly.</div>
          </div>

          <div className="param-row">
            <div className="param-name"><code>language</code></div>
            <div className="param-body">You can use the `system` setting to match their device or browser default, or you can specify a language if you have such a setting in user profiles. See the [Multi-language support](/resources/multi-language) guide for more info on supported languages.</div>
          </div>

          <div className="param-row">
            <div className="param-name"><code>theme</code></div>
            <div className="param-body">You can use the `system` setting to match their device or browser default, or you can specify a theme if you have such a setting in user profiles.</div>
          </div>

          <div className="param-row">
            <div className="param-name"><code>displayFiatCurrency</code></div>
            <div className="param-body">Link defaults to USD, or you can specify a fiat currency if you have such a setting in user profiles. See the [Fiat currency support](/resources/fiat-currency) guide for more info on supported currencies</div>
          </div>

          <div className="param-row">
            <div className="param-name"><code>accessTokens</code></div>
            <div className="param-body">After users connect an exchange account, Mesh can maintain authorization so that the user doesn't have to login again. This enables a 1 or 2 click transfer experience for return users. See the [Use Mesh's callback functions](/build/callbacks) guide for more information on consuming Mesh SDK events and handling them with callback functions, and the [Supercharge return-users](/build/return-users) guide to set up a return user experience</div>
          </div>

          <div className="param-row">
            <div className="param-name"><code>linkToken</code></div>
            <div className="param-body">Link token returned by the Mesh backend.</div>
          </div>
        </div>
      </Accordion>
    </div>

    ```javascript theme={null}
    const connection = createLink({
      renderType: 'overlay', // Opens SDK on top of your web app
      theme: 'system',
      language: 'system',
      displayFiatCurrency: 'USD',
      accessTokens: accessTokens, // See "Supercharge return users" guide
      onIntegrationConnected: payload => {
        // Payload contains integration tokens that can be passed to SDK for a return user experience, or calling certain Mesh APIs
        console.log('[MESH LINK integration connected]', payload)
      },
      onTransferFinished: payload => {
        // Called after a transfer flow completes successfully
        console.log('[MESH LINK transfer finished]', payload)
      },
      onExit: () => {
        // Called when Link is closed
        console.log('[MESH LINK exited]')
      },
      onEvent: ev => {
        // Allows you to handle other specific events
        console.log('[MESH LINK event]', ev)
      }
    })

    connection.openLink(linkToken)
    ```

    * The `createLink` function accepts one argument, a configuration Object typed `LinkOptions` and returns an Object with two functions, `openLink` and `closeLink`. Calling `openLink` will render the Link UI in an iframe. Calling `closeLink` will close the already-rendered Link UI. Please note, that the Link UI will close itself once the user finishes their workflow.
  </Accordion>

  <Accordion icon="https://mintcdn.com/mesh-40/Y-QnDCJ7fcNNqJ5o/images/icons/apple.svg?fit=max&auto=format&n=Y-QnDCJ7fcNNqJ5o&q=85&s=3ea087c17aff5ef105e1f1e3cc39de58" title="iOS Native SDK initialization structure" width="24" height="24" data-path="images/icons/apple.svg">
    <div className="parameter-reference">
      <Accordion title="Parameter reference">
        <div className="param-list">
          <div className="param-row">
            <div className="param-name"><code>language</code></div>
            <div className="param-body">You can use the `system` setting to match their device or browser default, or you can specify a language if you have such a setting in user profiles. See the [Multi-language support](/resources/multi-language) guide for more info on supported languages.</div>
          </div>

          <div className="param-row">
            <div className="param-name"><code>theme</code></div>
            <div className="param-body">You can use the `system` setting to match their device or browser default, or you can specify a theme if you have such a setting in user profiles.</div>
          </div>

          <div className="param-row">
            <div className="param-name"><code>displayFiatCurrency</code></div>
            <div className="param-body">Link defaults to USD, or you can specify a fiat currency if you have such a setting in user profiles. See the [Fiat currency support](/resources/fiat-currency) guide for more info on supported currencies</div>
          </div>

          <div className="param-row">
            <div className="param-name"><code>accessTokens</code></div>
            <div className="param-body">After users connect an exchange account, Mesh can maintain authorization so that the user doesn't have to login again. This enables a 1 or 2 click transfer experience for return users. See the [Use Mesh's callback functions](/build/callbacks) guide for more information on consuming Mesh SDK events and handling them with callback functions, and the [Supercharge return-users](/build/return-users) guide to set up a return user experience</div>
          </div>

          <div className="param-row">
            <div className="param-name"><code>linkToken</code></div>
            <div className="param-body">Link token returned by the Mesh backend.</div>
          </div>
        </div>
      </Accordion>
    </div>

    ```swift theme={null}
    func launchMeshLink(
        linkToken: String,
        viewController: UIViewController,
        accessTokens: [IntegrationAccessToken]? = nil
    ) {
        var linkHandler: LinkHandler?

        let settings = LinkSettings(
            accessTokens: accessTokens, // See "Supercharge return users" guide
            language: "system",
            displayFiatCurrency: "USD",
            theme: .system
        )

        // Called after a user connects an exchange, wallet, or other integration.
        let onIntegrationConnected: (LinkPayload) -> Void = { linkPayload in
            switch linkPayload {
            case .accessToken(let accessTokenPayload):
                print(accessTokenPayload)
            case .delayedAuth(let delayedAuthPayload):
                print(delayedAuthPayload)
            @unknown default:
                print("unknown LinkPayload")
            }
        }

        // Called after a transfer flow completes successfully or fails.
        let onTransferFinished: (TransferFinishedPayload) -> Void = { transferFinishedPayload in
            switch transferFinishedPayload {
            case .success(let successPayload):
                print(successPayload)
            case .error(let errorPayload):
                print(errorPayload)
            @unknown default:
                print("unknown TransferFinishedPayload")
            }
        }

        // Called throughout the Link flow so you can track user progress.
        let onEvent: ([String: Any]?) -> Void = { payload in
            print("Event: \(payload ?? [:])")
        }

        // Called when the user exits Link
        let onExit: (Bool?) -> Void = { showAlert in
            // showAlert is true when 'x' button is tapped
            // showAlert is false when 'Done' button is tapped on a Transfer Success screen
            if showAlert ?? false {
                // in case a custom alert is implemented, linkHandler?.closeLink() must be called to close Link
                linkHandler?.showExitAlert() // default Exit alert
            } else {
                linkHandler?.closeLink()
            }
        }

        let configuration = LinkConfiguration(
            linkToken: linkToken,
            settings: settings,
            disableDomainWhiteList: false,
            onIntegrationConnected: onIntegrationConnected,
            onTransferFinished: onTransferFinished,
            onEvent: onEvent,
            // onExit is optional, a default alert is shown in case onExit is omitted
            onExit: onExit
        )

        let result = configuration.createHandler()

        // createHandler validates the configuration before Link is presented.
        switch result {
        case .success(let handler):
            linkHandler = handler
            // Present Link from the current UIViewController.
            handler.present(in: viewController)
        case .failure(let error):
            print(error)
        @unknown default:
            print("unknown LinkResult")
        }
    }
    ```
  </Accordion>

  <Accordion icon="https://mintcdn.com/mesh-40/Y-QnDCJ7fcNNqJ5o/images/icons/android.svg?fit=max&auto=format&n=Y-QnDCJ7fcNNqJ5o&q=85&s=0bbbb8fb34fea77c1a25aaa3c9d5dacc" title="Android Native SDK initialization structure" width="24" height="24" data-path="images/icons/android.svg">
    <div className="parameter-reference">
      <Accordion title="Parameter reference">
        <div className="param-list">
          <div className="param-row">
            <div className="param-name"><code>linkToken</code></div>
            <div className="param-body">Link token returned by the Mesh backend.</div>
          </div>

          <div className="param-row">
            <div className="param-name"><code>language</code></div>
            <div className="param-body">You can use the `system` setting to match their device or browser default, or you can specify a language if you have such a setting in user profiles. See the [Multi-language support](/resources/multi-language) guide for more info on supported languages.</div>
          </div>

          <div className="param-row">
            <div className="param-name"><code>theme</code></div>
            <div className="param-body">You can use the `system` setting to match their device or browser default, or you can specify a theme if you have such a setting in user profiles.</div>
          </div>

          <div className="param-row">
            <div className="param-name"><code>displayFiatCurrency</code></div>
            <div className="param-body">Link defaults to USD, or you can specify a fiat currency if you have such a setting in user profiles. See the [Fiat currency support](/resources/fiat-currency) guide for more info on supported currencies</div>
          </div>

          <div className="param-row">
            <div className="param-name"><code>accessTokens</code></div>
            <div className="param-body">After users connect an exchange account, Mesh can maintain authorization so that the user doesn't have to login again. This enables a 1 or 2 click transfer experience for return users. See the [Use Mesh's callback functions](/build/callbacks) guide for more information on consuming Mesh SDK events and handling them with callback functions, and the [Supercharge return-users](/build/return-users) guide to set up a return user experience</div>
          </div>
        </div>
      </Accordion>
    </div>

    ```kotlin theme={null}
    // Register the Link launcher as an Activity or Fragment property
    private val linkLauncher = registerForActivityResult(LaunchLink()) { result ->
        when (result) {
            is LinkSuccess -> {
                // Called when Link returns payloads, such as a connected account or completed transfer.
                Log.i(LOG_TAG, "LinkSuccess: ${result.payloads}")
            }
            is LinkExit -> {
                // Called when Link exits without payloads, including user exits or errors.
                Log.i(LOG_TAG, "LinkExit: ${result.errorMessage}")
            }
        }
    }

    private fun launchMeshLink(linkToken: String, accessTokens: List<IntegrationAccessToken>? = null) {
        // Create LinkConfiguration
        val configuration = LinkConfiguration(
            token = linkToken,
            theme = LinkTheme.SYSTEM,
            language = "system",
            displayFiatCurrency = "USD",
            accessTokens = accessTokens,
        )

        // Launch
        linkLauncher.launch(configuration)
    }
    ```
  </Accordion>

  <Accordion icon="https://mintcdn.com/mesh-40/Y-QnDCJ7fcNNqJ5o/images/icons/react.svg?fit=max&auto=format&n=Y-QnDCJ7fcNNqJ5o&q=85&s=162ed81498b01d342d25c427bd7bd5c7" title="ReactNative SDK initialization structure" width="24" height="24" data-path="images/icons/react.svg">
    <div className="parameter-reference">
      <Accordion title="Parameter reference">
        <div className="param-list">
          <div className="param-row">
            <div className="param-name"><code>linkToken</code></div>
            <div className="param-body">Link token returned by the Mesh backend.</div>
          </div>

          <div className="param-row">
            <div className="param-name"><code>language</code></div>
            <div className="param-body">You can use the `system` setting to match their device or browser default, or you can specify a language if you have such a setting in user profiles. See the [Multi-language support](/resources/multi-language) guide for more info on supported languages.</div>
          </div>

          <div className="param-row">
            <div className="param-name"><code>theme</code></div>
            <div className="param-body">You can use the `system` setting to match their device or browser default, or you can specify a theme if you have such a setting in user profiles.</div>
          </div>

          <div className="param-row">
            <div className="param-name"><code>displayFiatCurrency</code></div>
            <div className="param-body">Link defaults to USD, or you can specify a fiat currency if you have such a setting in user profiles. See the [Fiat currency support](/resources/fiat-currency) guide for more info on supported currencies</div>
          </div>

          <div className="param-row">
            <div className="param-name"><code>accessTokens</code></div>
            <div className="param-body">After users connect an exchange account, Mesh can maintain authorization so that the user doesn't have to login again. This enables a 1 or 2 click transfer experience for return users. See the [Use Mesh's callback functions](/build/callbacks) guide for more information on consuming Mesh SDK events and handling them with callback functions, and the [Supercharge return-users](/build/return-users) guide to set up a return user experience</div>
          </div>
        </div>
      </Accordion>
    </div>

    ```javascript theme={null}
    return (
      <LinkConnect
        linkToken={linkToken}
        settings={{
          language: 'system',
          displayFiatCurrency: 'USD',
          accessTokens, // See "Supercharge return users" guide
        }}
        onIntegrationConnected={(payload: LinkPayload) => {
          // Payload contains integration tokens that can be passed to SDK for a return user experience, or calling certain Mesh APIs
          console.log('[MESH LINK integration connected]', payload);
        }}
        onTransferFinished={(payload: TransferFinishedPayload) => {
          // Called after a transfer flow completes successfully or fails.
          console.log('[MESH LINK transfer finished]', payload);
        }}
        onEvent={(event: LinkEventType) => {
          // Allows you to handle other specific events
          console.log('[MESH LINK event]', event);
        }}
        onExit={(err?: string) => {
          // Called when Mesh Link exits, completes, is closed by the user, or fails during setup.
          console.log('[MESH LINK exited]');
        }}
      />
    );
    ```
  </Accordion>

  <Accordion icon="https://mintcdn.com/mesh-40/Y-QnDCJ7fcNNqJ5o/images/icons/flutter.svg?fit=max&auto=format&n=Y-QnDCJ7fcNNqJ5o&q=85&s=efe91e3117513e06731a5bbf7321efd0" title="Flutter SDK initialization structure" width="24" height="24" data-path="images/icons/flutter.svg">
    <div className="parameter-reference">
      <Accordion title="Parameter reference">
        <div className="param-list">
          <div className="param-row">
            <div className="param-name"><code>linkToken</code></div>
            <div className="param-body">Link token returned by the Mesh backend.</div>
          </div>

          <div className="param-row">
            <div className="param-name"><code>language</code></div>
            <div className="param-body">You can use the `system` setting to match their device or browser default, or you can specify a language if you have such a setting in user profiles. See the [Multi-language support](/resources/multi-language) guide for more info on supported languages.</div>
          </div>

          <div className="param-row">
            <div className="param-name"><code>theme</code></div>
            <div className="param-body">You can use the `system` setting to match their device or browser default, or you can specify a theme if you have such a setting in user profiles.</div>
          </div>

          <div className="param-row">
            <div className="param-name"><code>displayFiatCurrency</code></div>
            <div className="param-body">Link defaults to USD, or you can specify a fiat currency if you have such a setting in user profiles. See the [Fiat currency support](/resources/fiat-currency) guide for more info on supported currencies</div>
          </div>

          <div className="param-row">
            <div className="param-name"><code>accessTokens</code></div>
            <div className="param-body">After users connect an exchange account, Mesh can maintain authorization so that the user doesn't have to login again. This enables a 1 or 2 click transfer experience for return users. See the [Use Mesh's callback functions](/build/callbacks) guide for more information on consuming Mesh SDK events and handling them with callback functions, and the [Supercharge return-users](/build/return-users) guide to set up a return user experience</div>
          </div>
        </div>
      </Accordion>
    </div>

    ```dart theme={null}
    Future<void> _showMeshLinkPage(
        String linkToken, {
        List<IntegrationAccessToken> accessTokens = const [],
    }) async {
      // Show MeshSdk
      final result = await MeshSdk.show(
        context,
        configuration: MeshConfiguration(
          language: 'system', // See "Multi-language support" guide
          displayFiatCurrency: 'USD', // See "Fiat currency support" guide
          theme: ThemeMode.system,
          integrationAccessTokens: accessTokens, // See "Supercharge return users" guide
          linkToken: linkToken,
          onEvent: (event) {
            // Allows you to handle other specific events
            print('Mesh event: $event');
          },
          onError: (errorType) {
            // Callback for when Mesh Link exits due to an error
            print('Mesh exit: $errorType');
          },
          onSuccess: (payload) {
            // Callback for when the Mesh Link is successfully completed
            print('Mesh success: ${payload.page}');
          },
          onIntegrationConnected: (integration) {
            // Payload contains integration tokens that can be passed to SDK for a return user experience, or calling certain Mesh APIs
            print('Integration connected: $integration');
          },
          onTransferFinished: (transfer) {
            // Called after a transfer flow completes successfully or fails.
            print('Transfer finished: $transfer');
          },
        ),
      );

      // Handle the result
      switch (result) {
        case MeshSuccess():
          print('Mesh link finished successfully');
        case MeshError():
          print('Mesh link error: ${result.type}');
      }

      // Alternatively, use `when` method
      result.when(
        success: (success) {
          final payload = success.payload;
          print('Mesh link success: ${payload.page}');
        },
        error: (error) {
          final errorType = error.type;
          print('Mesh link error: $errorType');
        },
      );
    }
    ```
  </Accordion>
</AccordionGroup>

### Option 3: Paylinks (a Mesh-hosted webpage)

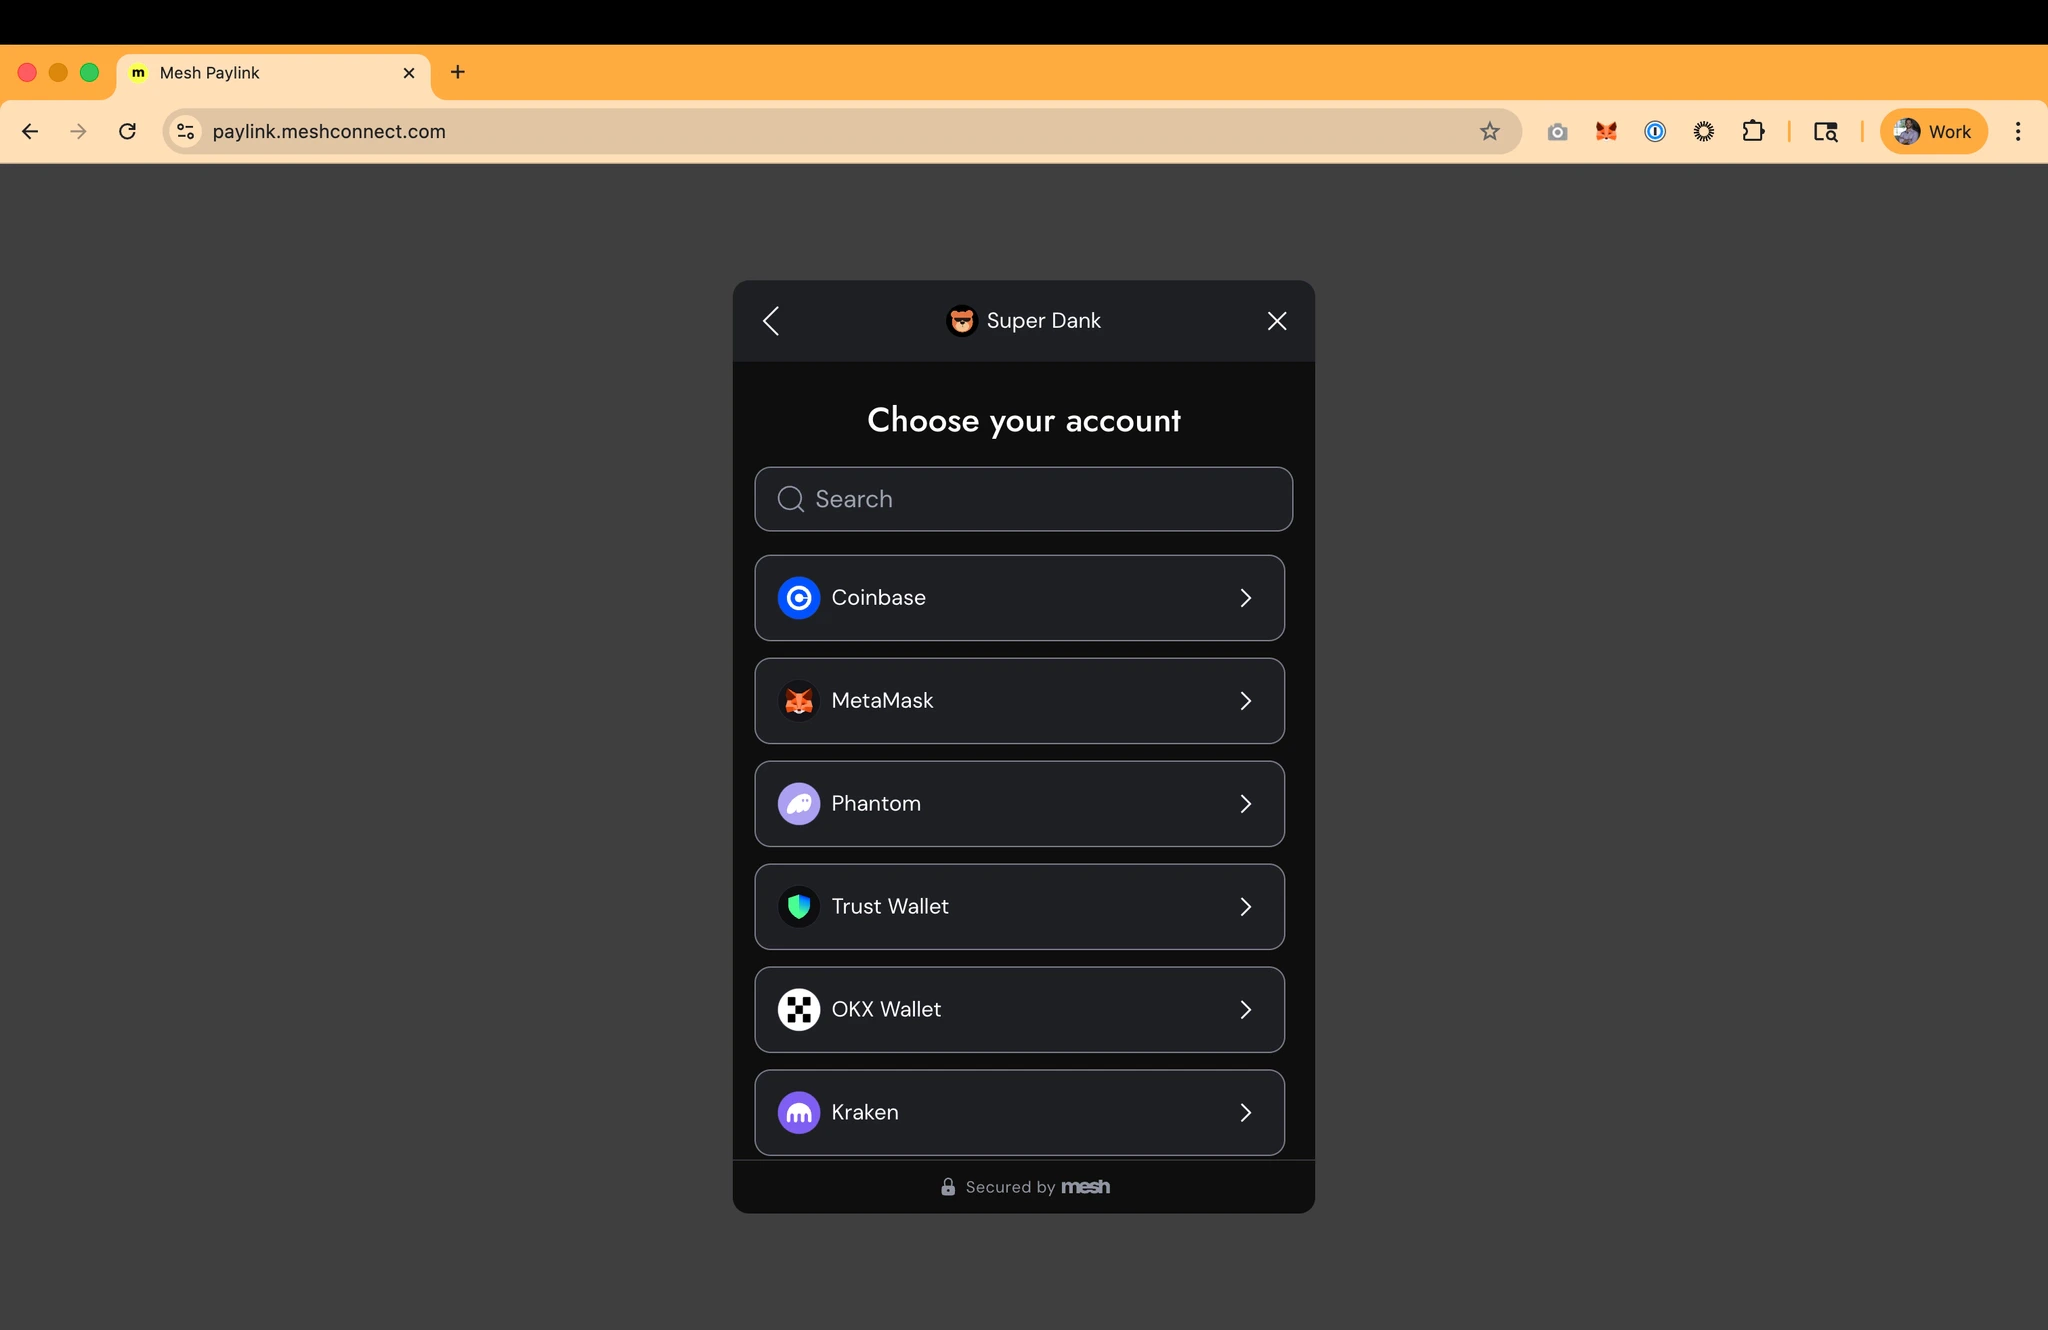
When `generatePayLink: true` in the The Link Token request, the response will include a `paymentLink` url. You can launch this Mesh-hosted webpage in a browser for your user, which avoids the need to download and install the Mesh SDK. When using this approach, it is recommended to also provide a url in the `payLinkReturnUrl` parameter which is where the user will be directed back to upon completion of their session.

Payment Links are short-lived (10mins) and one-time use.

***Note: Paylinks are generally not recommended since they miss out on some session-specific SDK configurations, but they're a handy fallback for teams with limited engineering resources or other technical constraints.***

<Frame>
  <img src="https://mintcdn.com/mesh-40/Y-QnDCJ7fcNNqJ5o/images/image-10.png?fit=max&auto=format&n=Y-QnDCJ7fcNNqJ5o&q=85&s=5cd7ed141e92f8fb05be45db27478011" alt="Image" width="2048" height="1330" data-path="images/image-10.png" />
</Frame>

## What's next

You've initialized the SDK — now you need to handle what comes back from it. Next up: [Use Mesh's callback functions](/build/callbacks) — wire up the SDK's callback functions to respond to key events like transfer completion and user exit.

***

<Accordion title="AI coding reference (llms.txt)">
  *AI coding reference — a compact summary of this page's APIs, parameters, and patterns for use by AI coding assistants (following the [llms.txt standard](https://llmstxt.org/)). Human readers can safely ignore this.*

  **llms.txt — Launch the Mesh SDK**

  Initialize and launch the Mesh Link SDK. Three rendering modes for Web; native initialization for iOS, Android, React Native, Flutter.

  **Web — createLink() params**: `renderType` ('embedded' or 'overlay') | `theme` ('system'/'dark'/'light') | `language` ('system' or BCP 47) | `displayFiatCurrency` (ISO 4217, default 'USD') | `accessTokens` (MMT return-user array) | `onIntegrationConnected` | `onTransferFinished` | `onExit` | `onEvent`

  **Web launch**: `connection.openLink(linkToken)` (overlay) or `connection.openLink(linkToken, 'custom-iframe-id')` (embedded) | **Close**: `connection.closeLink()`

  **Rendering options**:

  * **Embedded** (recommended for web): iframe in your container. Min height 450px, recommended 665px.
  * **Overlay**: modal popup over your app.
  * **Paylink**: `generatePayLink: true` in Link Token request → `paymentLink` URL in response. No SDK install needed. Short-lived (10 min), single-use.

  **iOS** (`LinkConfiguration`): `linkToken` | `settings` (LinkSettings: `accessTokens`, `language`, `displayFiatCurrency`, `theme`) | `onIntegrationConnected` | `onTransferFinished` | `onEvent` | `onExit` → `configuration.createHandler()` → `handler.present(in: viewController)`

  **Android** (`LinkConfiguration`): `token` | `theme` (LinkTheme.SYSTEM) | `language` | `displayFiatCurrency` | `accessTokens` → `linkLauncher.launch(configuration)`. Results: `LinkSuccess` (has `payloads`) | `LinkExit` (has `errorMessage`)

  **React Native**: `<LinkConnect linkToken={} settings={{language, displayFiatCurrency, accessTokens}} onIntegrationConnected onTransferFinished onEvent onExit />`

  **Flutter**: `MeshSdk.show(context, configuration: MeshConfiguration(linkToken, language, displayFiatCurrency, theme: ThemeMode.system, integrationAccessTokens, onEvent, onError, onSuccess, onIntegrationConnected, onTransferFinished))`

  **Web (overlay) — copy/paste snippet**:

  ```javascript theme={null}
  const connection = createLink({
    renderType: 'overlay', // Opens SDK on top of your web app
    theme: 'system',
    language: 'system',
    displayFiatCurrency: 'USD',
    accessTokens: accessTokens, // See "Supercharge return users" guide
    onIntegrationConnected: payload => {
      // Payload contains integration tokens that can be passed to SDK for a return user experience, or calling certain Mesh APIs
      console.log('[MESH LINK integration connected]', payload)
    },
    onTransferFinished: payload => {
      // Called after a transfer flow completes successfully
      console.log('[MESH LINK transfer finished]', payload)
    },
    onExit: () => {
      // Called when Link is closed
      console.log('[MESH LINK exited]')
    },
    onEvent: ev => {
      // Allows you to handle other specific events
      console.log('[MESH LINK event]', ev)
    }
  })

  connection.openLink(linkToken)
  ```

  **iOS Swift — copy/paste snippet**:

  ```swift theme={null}
  func launchMeshLink(
      linkToken: String,
      viewController: UIViewController,
      accessTokens: [IntegrationAccessToken]? = nil
  ) {
      var linkHandler: LinkHandler?

      let settings = LinkSettings(
          accessTokens: accessTokens, // See "Supercharge return users" guide
          language: "system",
          displayFiatCurrency: "USD",
          theme: .system
      )

      // Called after a user connects an exchange, wallet, or other integration.
      let onIntegrationConnected: (LinkPayload) -> Void = { linkPayload in
          switch linkPayload {
          case .accessToken(let accessTokenPayload):
              print(accessTokenPayload)
          case .delayedAuth(let delayedAuthPayload):
              print(delayedAuthPayload)
          @unknown default:
              print("unknown LinkPayload")
          }
      }

      // Called after a transfer flow completes successfully or fails.
      let onTransferFinished: (TransferFinishedPayload) -> Void = { transferFinishedPayload in
          switch transferFinishedPayload {
          case .success(let successPayload):
              print(successPayload)
          case .error(let errorPayload):
              print(errorPayload)
          @unknown default:
              print("unknown TransferFinishedPayload")
          }
      }

      // Called throughout the Link flow so you can track user progress.
      let onEvent: ([String: Any]?) -> Void = { payload in
          print("Event: \(payload ?? [:])")
      }

      // Called when the user exits Link
      let onExit: (Bool?) -> Void = { showAlert in
          // showAlert is true when 'x' button is tapped
          // showAlert is false when 'Done' button is tapped on a Transfer Success screen
          if showAlert ?? false {
              // in case a custom alert is implemented, linkHandler?.closeLink() must be called to close Link
              linkHandler?.showExitAlert() // default Exit alert
          } else {
              linkHandler?.closeLink()
          }
      }

      let configuration = LinkConfiguration(
          linkToken: linkToken,
          settings: settings,
          disableDomainWhiteList: false,
          onIntegrationConnected: onIntegrationConnected,
          onTransferFinished: onTransferFinished,
          onEvent: onEvent,
          // onExit is optional, a default alert is shown in case onExit is omitted
          onExit: onExit
      )

      let result = configuration.createHandler()

      // createHandler validates the configuration before Link is presented.
      switch result {
      case .success(let handler):
          linkHandler = handler
          // Present Link from the current UIViewController.
          handler.present(in: viewController)
      case .failure(let error):
          print(error)
      @unknown default:
          print("unknown LinkResult")
      }
  }
  ```

  **Android Kotlin — copy/paste snippet**:

  ```kotlin theme={null}
  // Register the Link launcher as an Activity or Fragment property
  private val linkLauncher = registerForActivityResult(LaunchLink()) { result ->
      when (result) {
          is LinkSuccess -> {
              // Called when Link returns payloads, such as a connected account or completed transfer.
              Log.i(LOG_TAG, "LinkSuccess: ${result.payloads}")
          }
          is LinkExit -> {
              // Called when Link exits without payloads, including user exits or errors.
              Log.i(LOG_TAG, "LinkExit: ${result.errorMessage}")
          }
      }
  }

  private fun launchMeshLink(linkToken: String, accessTokens: List<IntegrationAccessToken>? = null) {
      // Create LinkConfiguration
      val configuration = LinkConfiguration(
          token = linkToken,
          theme = LinkTheme.SYSTEM,
          language = "system",
          displayFiatCurrency = "USD",
          accessTokens = accessTokens,
      )

      // Launch
      linkLauncher.launch(configuration)
  }
  ```

  **React Native — copy/paste snippet**:

  ```javascript theme={null}
  return (
    <LinkConnect
      linkToken={linkToken}
      settings={{
        language: 'system',
        displayFiatCurrency: 'USD',
        accessTokens, // See "Supercharge return users" guide
      }}
      onIntegrationConnected={(payload: LinkPayload) => {
        // Payload contains integration tokens that can be passed to SDK for a return user experience, or calling certain Mesh APIs
        console.log('[MESH LINK integration connected]', payload);
      }}
      onTransferFinished={(payload: TransferFinishedPayload) => {
        // Called after a transfer flow completes successfully or fails.
        console.log('[MESH LINK transfer finished]', payload);
      }}
      onEvent={(event: LinkEventType) => {
        // Allows you to handle other specific events
        console.log('[MESH LINK event]', event);
      }}
      onExit={(err?: string) => {
        // Called when Mesh Link exits, completes, is closed by the user, or fails during setup.
        console.log('[MESH LINK exited]');
      }}
    />
  );
  ```

  **Flutter — copy/paste snippet**:

  ```dart theme={null}
  Future<void> _showMeshLinkPage(
      String linkToken, {
      List<IntegrationAccessToken> accessTokens = const [],
  }) async {
    // Show MeshSdk
    final result = await MeshSdk.show(
      context,
      configuration: MeshConfiguration(
        language: 'system', // See "Multi-language support" guide
        displayFiatCurrency: 'USD', // See "Fiat currency support" guide
        theme: ThemeMode.system,
        integrationAccessTokens: accessTokens, // See "Supercharge return users" guide
        linkToken: linkToken,
        onEvent: (event) {
          // Allows you to handle other specific events
          print('Mesh event: $event');
        },
        onError: (errorType) {
          // Callback for when Mesh Link exits due to an error
          print('Mesh exit: $errorType');
        },
        onSuccess: (payload) {
          // Callback for when the Mesh Link is successfully completed
          print('Mesh success: ${payload.page}');
        },
        onIntegrationConnected: (integration) {
          // Payload contains integration tokens that can be passed to SDK for a return user experience, or calling certain Mesh APIs
          print('Integration connected: $integration');
        },
        onTransferFinished: (transfer) {
          // Called after a transfer flow completes successfully or fails.
          print('Transfer finished: $transfer');
        },
      ),
    );

    // Handle the result
    switch (result) {
      case MeshSuccess():
        print('Mesh link finished successfully');
      case MeshError():
        print('Mesh link error: ${result.type}');
    }

    // Alternatively, use `when` method
    result.when(
      success: (success) {
        final payload = success.payload;
        print('Mesh link success: ${payload.page}');
      },
      error: (error) {
        final errorType = error.type;
        print('Mesh link error: $errorType');
      },
    );
  }
  ```
</Accordion>