Before you start
- You have a Mesh sandbox API key and the SDK installed for your platform (see Prepare to build)
- You know how to fetch a Link Token (see Fetch a Link Token)
Overview
Mesh’s client-side SDKs are supported on the following platforms:Web
iOS
Android
React Native
Flutter
Initialize the Mesh SDK
You have 3 options for how to launch Link. You should choose which one fits your UX and other needs the best.Option 1: Overlay
Link opens as a modal on top of your product, with a semi-opaque overlay behind it. This focuses the user on the task at hand and minimizes background noise and distractions.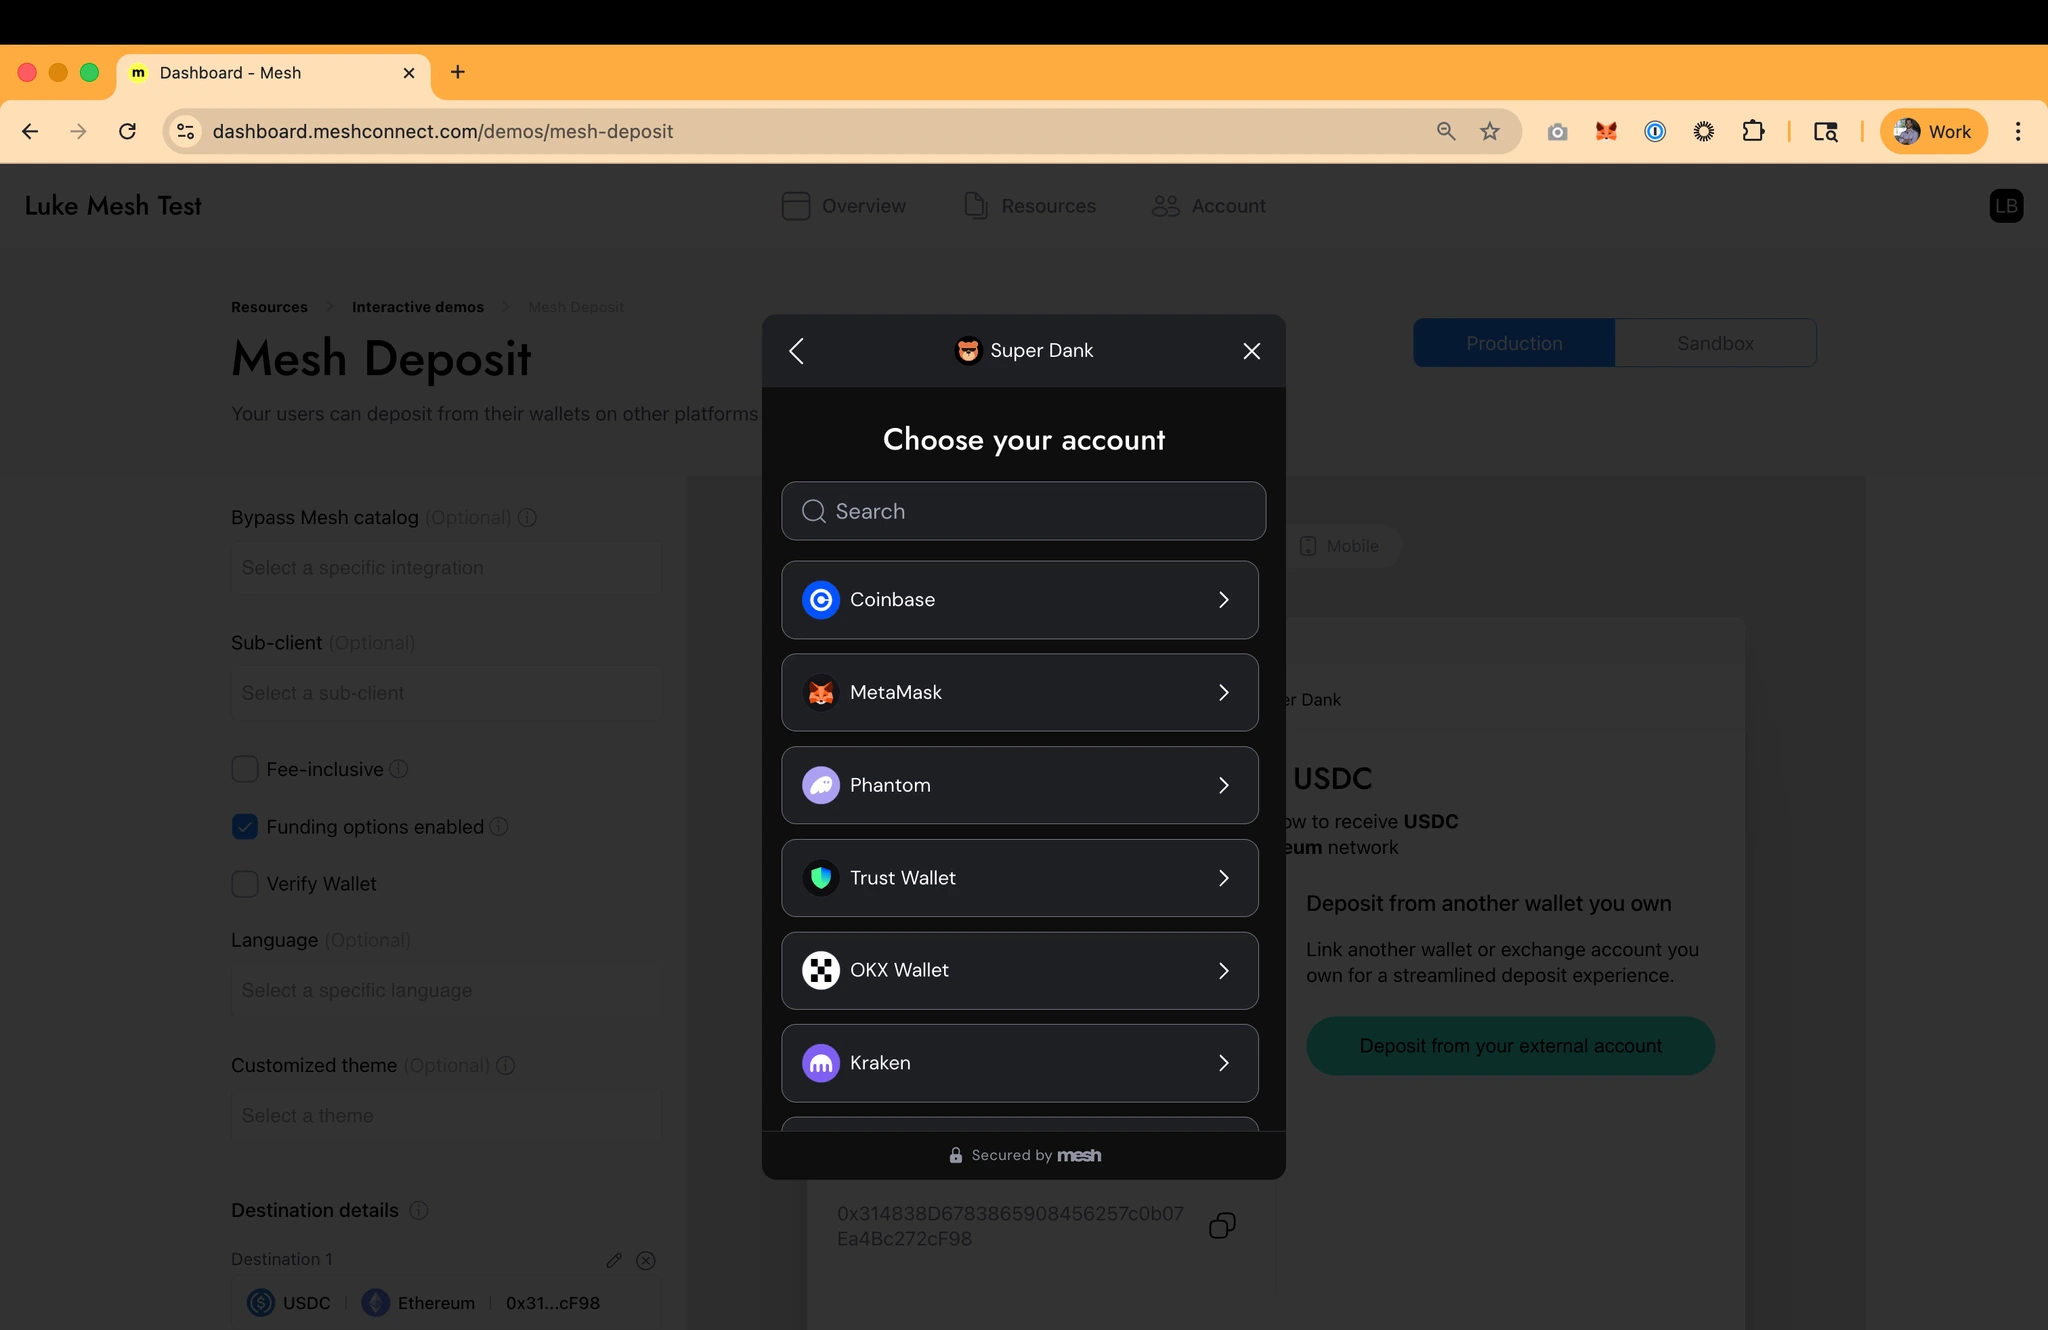
Web SDK initialization structure
Web SDK initialization structure
Parameter reference
Parameter reference
renderTypeoverlay indicates Mesh will pop up over your product and ensures certain UX elements behave accordingly.languageYou can use the
system setting to match their device or browser default, or you can specify a language if you have such a setting in user profiles. See the Multi-language support guide for more info on supported languages.themeYou can use the
system setting to match their device or browser default, or you can specify a theme if you have such a setting in user profiles.displayFiatCurrencyLink defaults to USD, or you can specify a fiat currency if you have such a setting in user profiles. See the Fiat currency support guide for more info on supported currencies
accessTokensAfter users connect an exchange account, Mesh can maintain authorization so that the user doesn’t have to login again. This enables a 1 or 2 click transfer experience for return users. See the Use Mesh’s callback functions guide for more information on consuming Mesh SDK events and handling them with callback functions, and the Supercharge return-users guide to set up a return user experience
linkTokenLink token returned by the Mesh backend.
- The
createLinkfunction accepts one argument, a configuration Object typedLinkOptionsand returns an Object with two functions,openLinkandcloseLink. CallingopenLinkwill render the Link UI in an iframe. CallingcloseLinkwill close the already-rendered Link UI. Please note, that the Link UI will close itself once the user finishes their workflow.
iOS Native SDK initialization structure
iOS Native SDK initialization structure
Parameter reference
Parameter reference
languageYou can use the
system setting to match their device or browser default, or you can specify a language if you have such a setting in user profiles. See the Multi-language support guide for more info on supported languages.themeYou can use the
system setting to match their device or browser default, or you can specify a theme if you have such a setting in user profiles.displayFiatCurrencyLink defaults to USD, or you can specify a fiat currency if you have such a setting in user profiles. See the Fiat currency support guide for more info on supported currencies
accessTokensAfter users connect an exchange account, Mesh can maintain authorization so that the user doesn’t have to login again. This enables a 1 or 2 click transfer experience for return users. See the Use Mesh’s callback functions guide for more information on consuming Mesh SDK events and handling them with callback functions, and the Supercharge return-users guide to set up a return user experience
linkTokenLink token returned by the Mesh backend.
Android Native SDK initialization structure
Android Native SDK initialization structure
Parameter reference
Parameter reference
linkTokenLink token returned by the Mesh backend.
languageYou can use the
system setting to match their device or browser default, or you can specify a language if you have such a setting in user profiles. See the Multi-language support guide for more info on supported languages.themeYou can use the
system setting to match their device or browser default, or you can specify a theme if you have such a setting in user profiles.displayFiatCurrencyLink defaults to USD, or you can specify a fiat currency if you have such a setting in user profiles. See the Fiat currency support guide for more info on supported currencies
accessTokensAfter users connect an exchange account, Mesh can maintain authorization so that the user doesn’t have to login again. This enables a 1 or 2 click transfer experience for return users. See the Use Mesh’s callback functions guide for more information on consuming Mesh SDK events and handling them with callback functions, and the Supercharge return-users guide to set up a return user experience
ReactNative SDK initialization structure
ReactNative SDK initialization structure
Parameter reference
Parameter reference
linkTokenLink token returned by the Mesh backend.
languageYou can use the
system setting to match their device or browser default, or you can specify a language if you have such a setting in user profiles. See the Multi-language support guide for more info on supported languages.themeYou can use the
system setting to match their device or browser default, or you can specify a theme if you have such a setting in user profiles.displayFiatCurrencyLink defaults to USD, or you can specify a fiat currency if you have such a setting in user profiles. See the Fiat currency support guide for more info on supported currencies
accessTokensAfter users connect an exchange account, Mesh can maintain authorization so that the user doesn’t have to login again. This enables a 1 or 2 click transfer experience for return users. See the Use Mesh’s callback functions guide for more information on consuming Mesh SDK events and handling them with callback functions, and the Supercharge return-users guide to set up a return user experience
Flutter SDK initialization structure
Flutter SDK initialization structure
Parameter reference
Parameter reference
linkTokenLink token returned by the Mesh backend.
languageYou can use the
system setting to match their device or browser default, or you can specify a language if you have such a setting in user profiles. See the Multi-language support guide for more info on supported languages.themeYou can use the
system setting to match their device or browser default, or you can specify a theme if you have such a setting in user profiles.displayFiatCurrencyLink defaults to USD, or you can specify a fiat currency if you have such a setting in user profiles. See the Fiat currency support guide for more info on supported currencies
accessTokensAfter users connect an exchange account, Mesh can maintain authorization so that the user doesn’t have to login again. This enables a 1 or 2 click transfer experience for return users. See the Use Mesh’s callback functions guide for more information on consuming Mesh SDK events and handling them with callback functions, and the Supercharge return-users guide to set up a return user experience
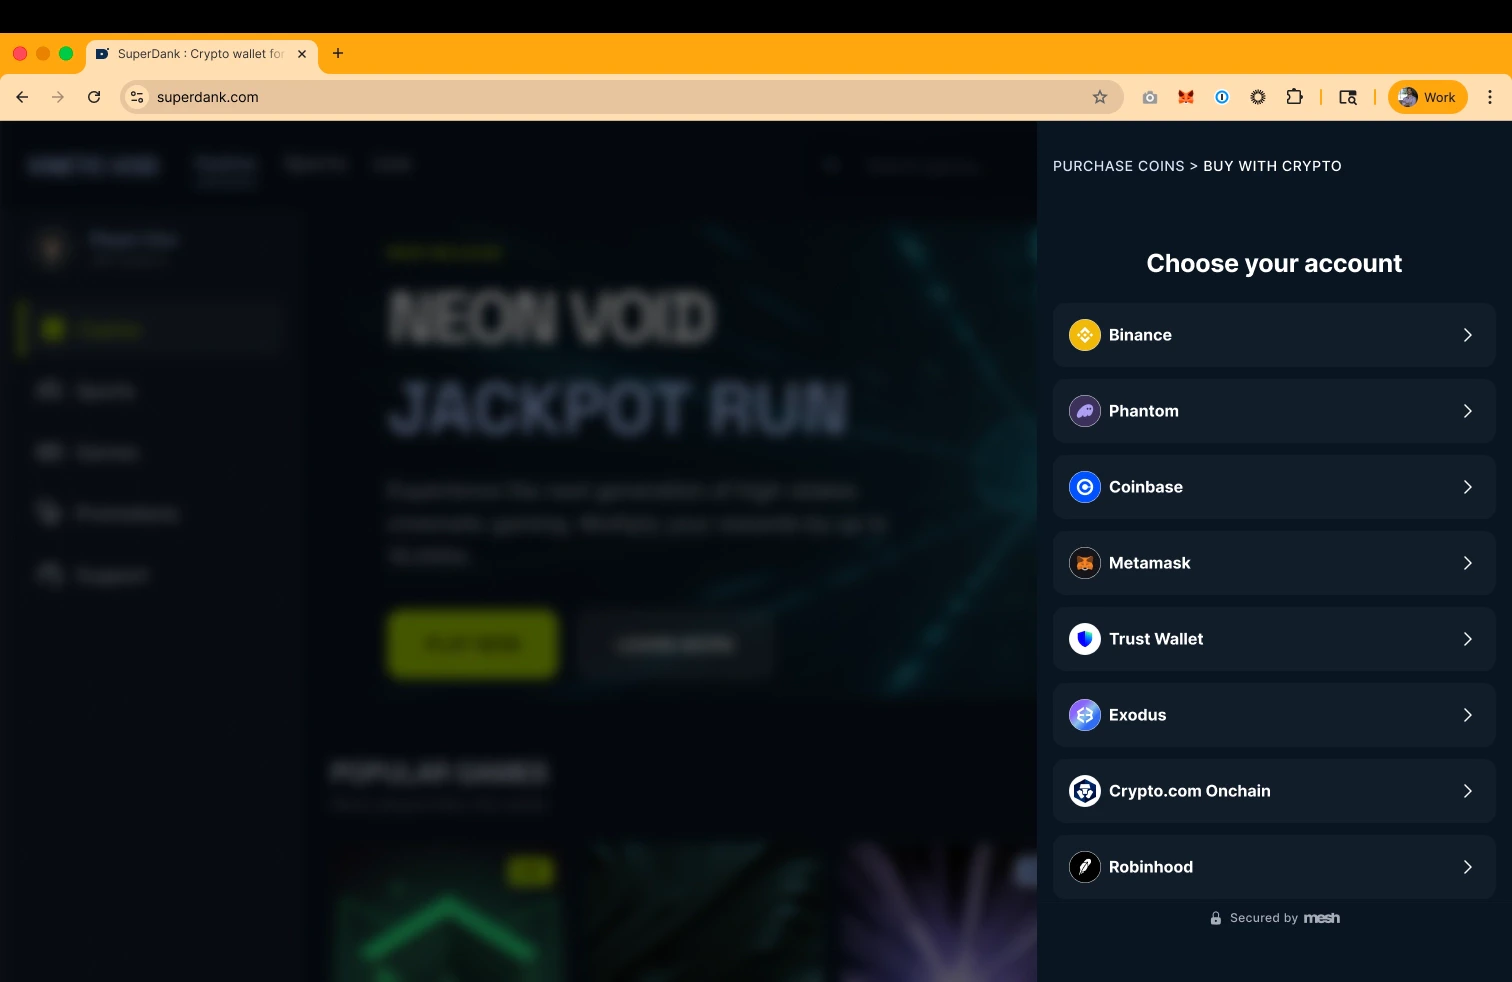
Option 2: Embedded (web SDK only)
Recommended for web implementations Link can be embedded as an iframe into a container within your product surface area. This makes it feel more native to your product by minimizing the “seam” between your app and Mesh. You provide a custom iframe ID in theopenLink function of the web SDK.
While this path will feel more native to your platform, it also comes with a slightly more involved implementation. Please see the Polish the experience guide for important instructions on how to properly implement this experience.
Web SDK initialization structure
Web SDK initialization structure
You’ll include a custom iframe ID in the
openLink function when embedding Link into a container in your product (see end of snippet).Parameter reference
Parameter reference
renderTypeembedded indicates this will not be an overlay, and will slightly modify the UX (importantly, the Mesh SDK nav bar goes away except for the back < button). When embedded, add a custom-iframe-id in the openLink function.custom-iframe-id (not a parameter, but including here for clarity)Lets you embed the Mesh SDK directly into a container within your product surface area.
languageYou can use the
system setting to match their device or browser default, or you can specify a language if you have such a setting in user profiles. See the Multi-language support guide for more info on supported languages.themeYou can use the
system setting to match their device or browser default, or you can specify a theme if you have such a setting in user profiles.displayFiatCurrencyLink defaults to USD, or you can specify a fiat currency if you have such a setting in user profiles. See the Fiat currency support guide for more info on supported currencies
accessTokensAfter users connect an exchange account, Mesh can maintain authorization so that the user doesn’t have to login again. This enables a 1 or 2 click transfer experience for return users. See the Use Mesh’s callback functions guide for more information on consuming Mesh SDK events and handling them with callback functions, and the Supercharge return-users guide to set up a return user experience
linkTokenLink token returned by the Mesh backend.
- The
createLinkfunction accepts one argument, a configuration Object typedLinkOptionsand returns an Object with two functions,openLinkandcloseLink. CallingopenLinkwill render the Link UI in an iframe. CallingcloseLinkwill close the already-rendered Link UI. Please note, that the Link UI will close itself once the user finishes their workflow.
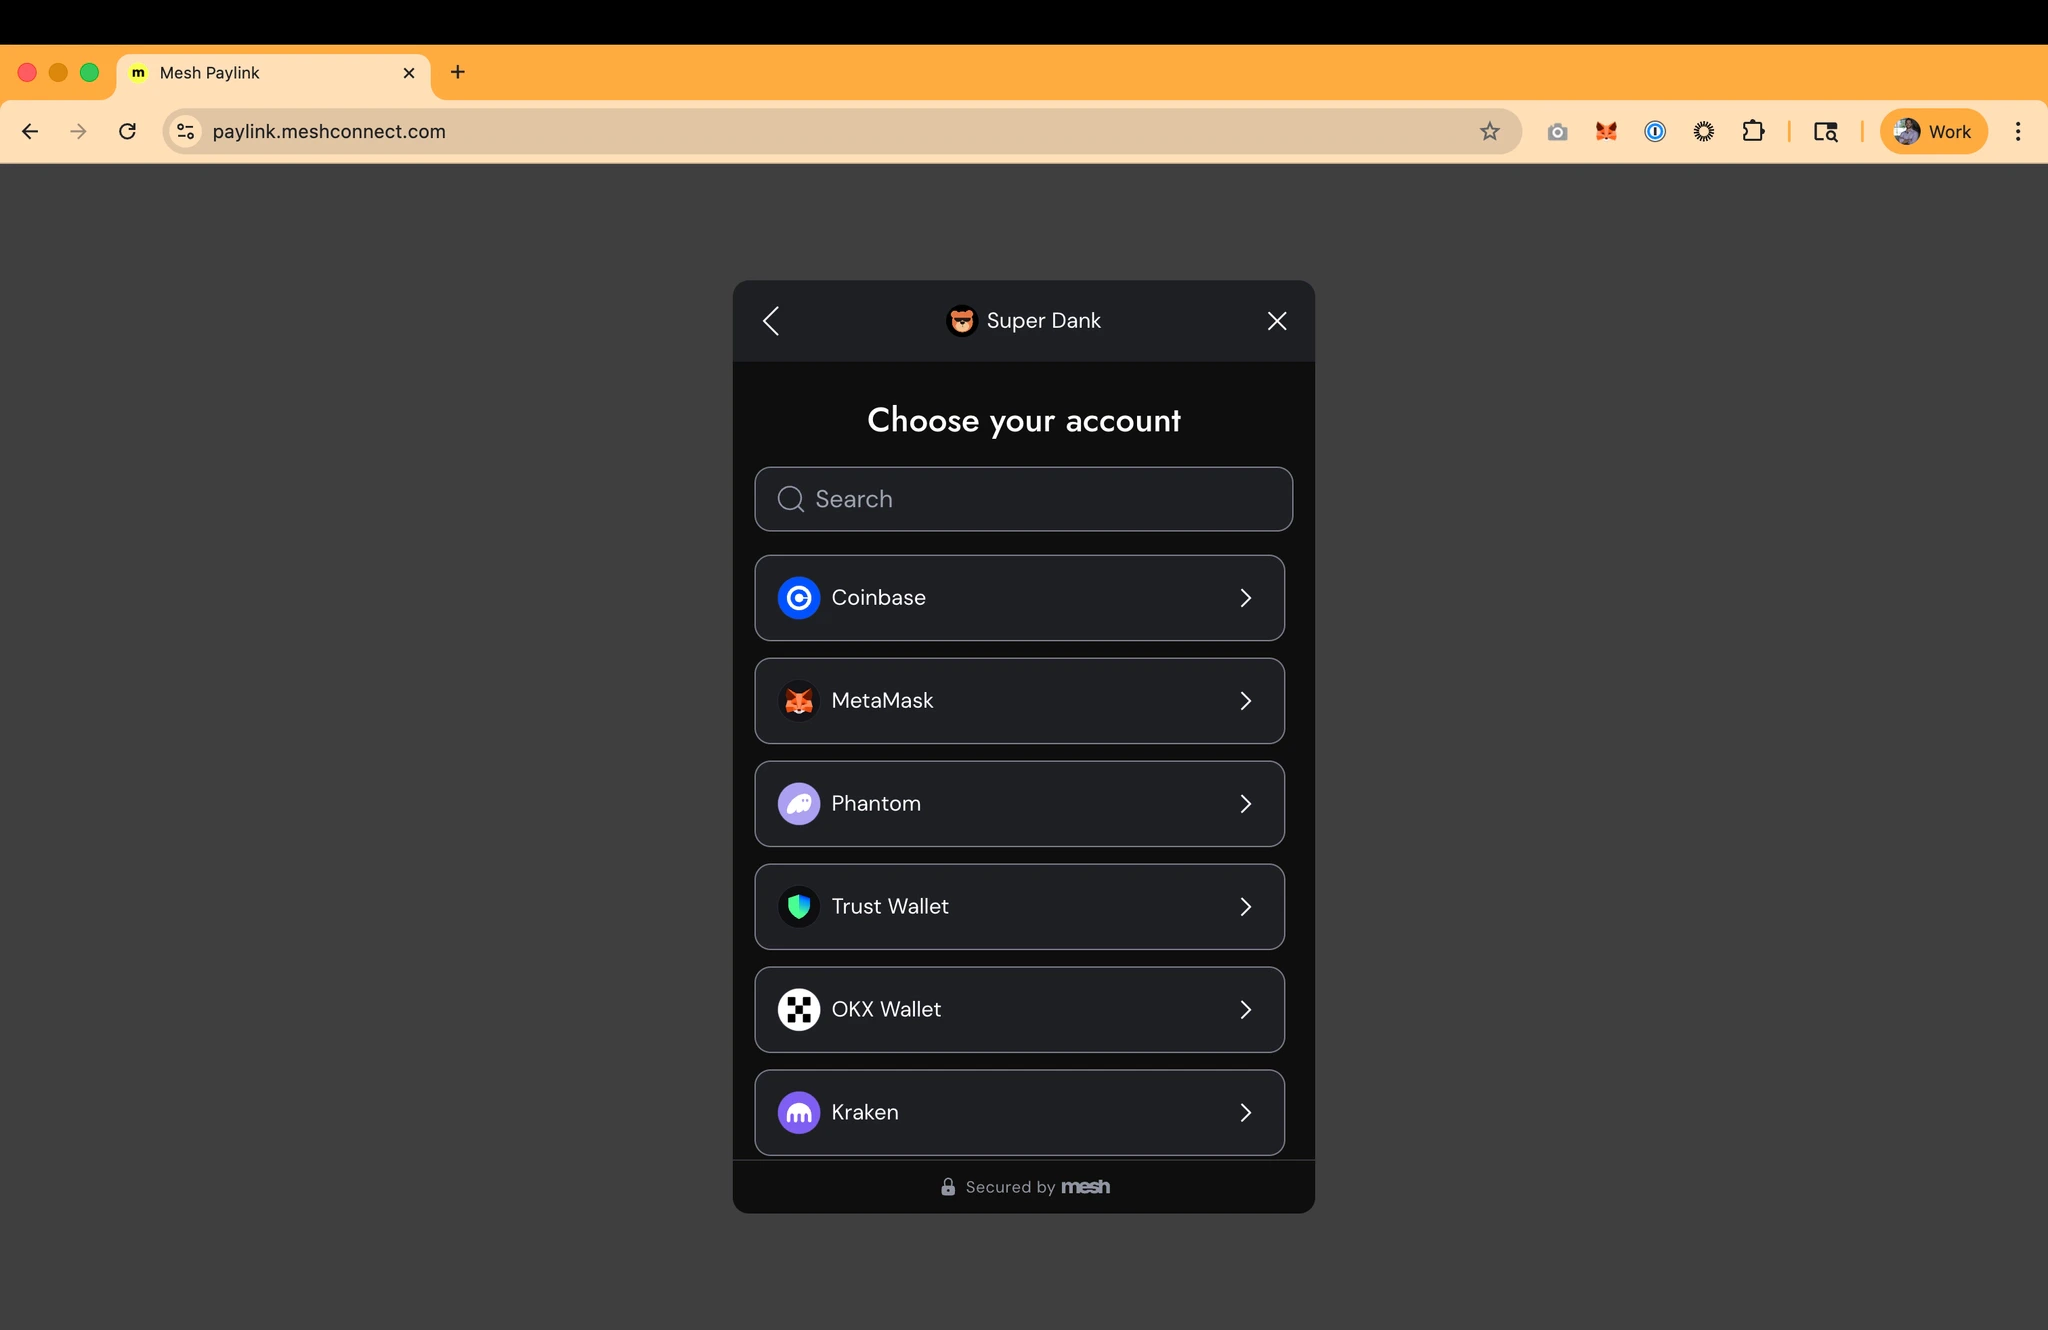
Option 3: Paylinks (a Mesh-hosted webpage)
WhengeneratePayLink: true in the The Link Token request, the response will include a paymentLink url. You can launch this Mesh-hosted webpage in a browser for your user, which avoids the need to download and install the Mesh SDK. When using this approach, it is recommended to also provide a url in the payLinkReturnUrl parameter which is where the user will be directed back to upon completion of their session.
Payment Links are short-lived (10mins) and one-time use.
Note: Paylinks are generally not recommended since they miss out on some session-specific SDK configurations, but they’re a handy fallback for teams with limited engineering resources or other technical constraints.
What’s next
You’ve initialized the SDK — now you need to handle what comes back from it. Next up: Use Mesh’s callback functions — wire up the SDK’s callback functions to respond to key events like transfer completion and user exit.AI coding reference (llms.txt)
AI coding reference (llms.txt)
AI coding reference — a compact summary of this page’s APIs, parameters, and patterns for use by AI coding assistants (following the llms.txt standard). Human readers can safely ignore this.llms.txt — Launch the Mesh SDKInitialize and launch the Mesh Link SDK. Three rendering modes for Web; native initialization for iOS, Android, React Native, Flutter.Web — createLink() params: iOS Swift — copy/paste snippet:Android Kotlin — copy/paste snippet:React Native — copy/paste snippet:Flutter — copy/paste snippet:
renderType (‘embedded’ or ‘overlay’) | theme (‘system’/‘dark’/‘light’) | language (‘system’ or BCP 47) | displayFiatCurrency (ISO 4217, default ‘USD’) | accessTokens (MMT return-user array) | onIntegrationConnected | onTransferFinished | onExit | onEventWeb launch: connection.openLink(linkToken) (overlay) or connection.openLink(linkToken, 'custom-iframe-id') (embedded) | Close: connection.closeLink()Rendering options:- Embedded (recommended for web): iframe in your container. Min height 450px, recommended 665px.
- Overlay: modal popup over your app.
- Paylink:
generatePayLink: truein Link Token request →paymentLinkURL in response. No SDK install needed. Short-lived (10 min), single-use.
LinkConfiguration): linkToken | settings (LinkSettings: accessTokens, language, displayFiatCurrency, theme) | onIntegrationConnected | onTransferFinished | onEvent | onExit → configuration.createHandler() → handler.present(in: viewController)Android (LinkConfiguration): token | theme (LinkTheme.SYSTEM) | language | displayFiatCurrency | accessTokens → linkLauncher.launch(configuration). Results: LinkSuccess (has payloads) | LinkExit (has errorMessage)React Native: <LinkConnect linkToken={} settings={{language, displayFiatCurrency, accessTokens}} onIntegrationConnected onTransferFinished onEvent onExit />Flutter: MeshSdk.show(context, configuration: MeshConfiguration(linkToken, language, displayFiatCurrency, theme: ThemeMode.system, integrationAccessTokens, onEvent, onError, onSuccess, onIntegrationConnected, onTransferFinished))Web (overlay) — copy/paste snippet: