Ready to build? Jump straight to the 15-minute quickstart or start from Prepare to build. Come back here if you want a map of how the pieces fit.
The big picture
Every Mesh integration involves three parties: your server, your client app, and Mesh. Here’s the full flow from button click to confirmed transfer.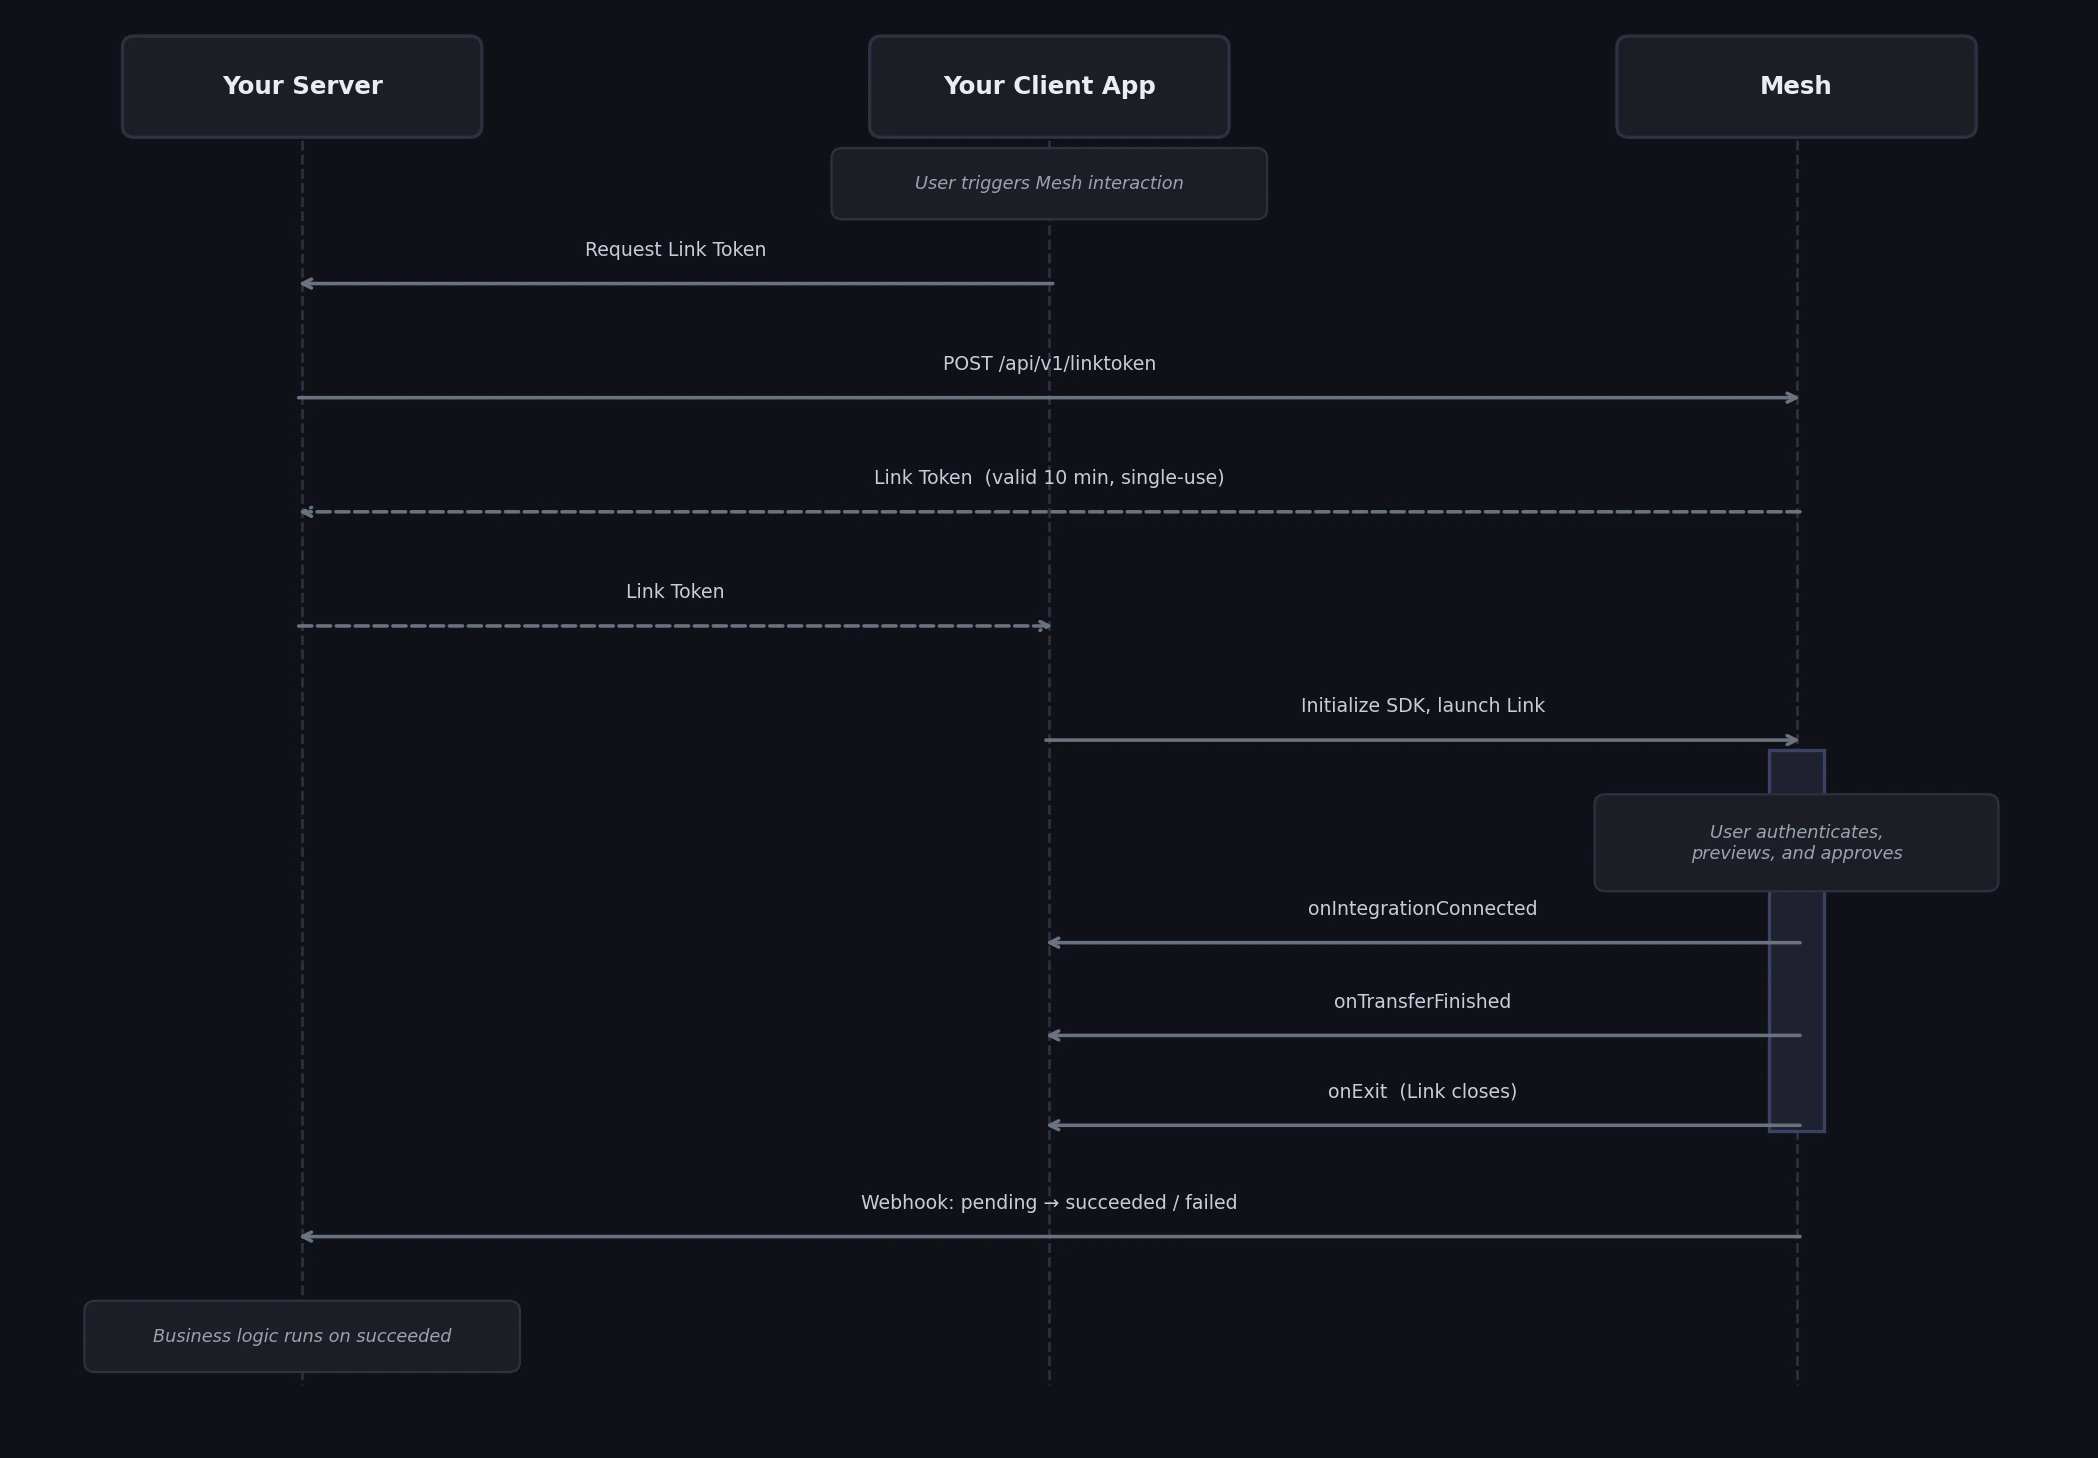
Step by step
Step 1: Request a Link Token (server-side)
Every Mesh session starts on your server. When a user triggers a Mesh interaction — clicking a “Deposit” or “Pay” button — your server makes aPOST /api/v1/linktoken request to Mesh.
This request configures the entire user session: transfer type (deposit, payment, onramp), destination address, amount constraints, supported networks and assets, display currency, and more. The Link Token encodes all of this configuration without exposing it to the client.
Link Tokens are short-lived (10 minutes) and single-use. Request a new one for each user session.
→ Fetch a Link Token for use-case-specific examples and the full parameter reference.
Step 2: Initialize and launch the SDK (client-side)
Your client receives the Link Token (passed through your own API), initializes the Mesh SDK with it, and launches Link. From this point, Mesh handles everything the user sees: the integration catalog, authentication flows, transfer preview, compliance steps, and success/error states. Link is available for five platforms — Web, iOS, Android, React Native, Flutter — each with a platform-specific initialization pattern. → Launch the Mesh SDK for all five platforms, including overlay, embedded, and Paylinks options.Step 3: Handle SDK callbacks (client-side)
When the user takes a significant action inside Link, the SDK fires callback functions in your app. The four callbacks:onIntegrationConnected— fires when the user successfully connects their exchange or wallet. The payload includes anaccessToken(with atokenId) that you should store server-side to enable one-tap return-user flows.onTransferFinished— fires when a transfer has been submitted. Containsstatus,transferId,txHash, and transfer details. Use this to update your UI and trigger any immediate client-side logic.onExit— fires whenever Link closes, regardless of outcome. Check thepagefield to detect whether the user finished the flow.onEvent— fires for granular user interactions throughout Link. Useful for analytics and specific UX logic.
onTransferFinished fires when a transfer request is acknowledged by the provider — not when it’s confirmed onchain. For final on-chain or exchange confirmation, always use webhooks (Step 4). A transfer that fires onTransferFinished with status: pending may still fail.Step 4: Verify the outcome with webhooks (server-side)
onTransferFinished tells you a user’s transfer request was acknowledged by the provider. Webhooks tell you what actually happened onchain.
After a transfer is submitted, Mesh sends POST requests to your registered webhook URL as the transfer status changes: first Pending, then either Succeeded or Failed. Use the Succeeded event — not the SDK callback — to credit a user’s account, release inventory, or trigger downstream business logic.
Webhooks are server-to-server. They arrive at your registered URL independently of whether the user’s browser or app is still open. Always rely on the
Succeeded webhook for final transfer confirmation.EventId as your idempotency key.
→ Transfer status webhooks for full setup including HMAC verification and the complete payload reference.
Return users: skipping re-authentication
Once a user has connected their account, they can skip re-authentication on future visits using Mesh Managed Tokens (MMT). WhenonIntegrationConnected fires, save the tokenId from the accessToken payload on your server. On the user’s next visit, pass the accessToken object to the SDK. The user can then complete a transfer in one or two taps with no re-login.
Mesh handles all token refresh logic. The tokenId you store never changes, even if the underlying access token expires.
→ Supercharge return-users for implementation details across all five SDK platforms.
What’s next
- 15-minute quickstart — build a working end-to-end integration in 5 steps
- Prepare to build — get your Mesh dashboard account, API keys, and SDK installed
- Concepts — definitions for every core term used across the guides
AI coding reference (llms.txt)
AI coding reference (llms.txt)
AI coding reference — a compact summary of this page’s APIs, parameters, and patterns for use by AI coding assistants (following the llms.txt standard). Human readers can safely ignore this.llms.txt — How it all fits togetherArchitecture overview of a complete Mesh integration. 3-party model: your server ↔ Mesh API, your client ↔ Mesh SDK (Link), Mesh → your webhook endpoint.4-step integration flow:
- Server → Mesh:
POST /api/v1/linktoken→ returnslinkToken. Configures the full user session (transfer type, destination, amounts, display options, etc.). - Client → SDK: Pass
linkTokentocreateLink()/LinkConfiguration/MeshConfiguration. CallopenLink(). Mesh handles all UX from this point. - SDK → Client callbacks:
onIntegrationConnected(savetokenIdfor MMT) |onTransferFinished(update UI) |onExit(checkpagefield) |onEvent(analytics) - Mesh → Server webhooks:
Pending→SucceededorFailed. UseSucceededto credit users / release inventory. Always verify HMAC-SHA256 signature.
onTransferFinished fires when the provider acknowledges the request, not on-chain confirmation. Always use the transfer.succeeded webhook for final confirmation.Return users (MMT): Store tokenId from onIntegrationConnected. Pass as accessTokens on next session → user skips re-auth entirely.Platforms: Web, iOS, Android, React Native, Flutter — all use the same Link Token; initialization pattern differs per SDK.